Module 3: The Patient Journey - From Consultation to Final Restoration
Introduction
Welcome to Module 3, where we walk through the complete patient journey for full-arch dental implant treatment. Understanding what to expect at each stage of your treatment helps reduce anxiety, prepare appropriately, and set realistic expectations for this transformative process.
Whether you're a patient preparing for your own journey, a referring dentist counseling patients, or a healthcare professional seeking to understand the complete treatment timeline, this module provides a comprehensive roadmap from initial consultation through final restoration and beyond.
At St. Louis South Oral & Maxillofacial Surgery, we believe that knowledge transforms uncertainty into confidence. By understanding each phase of treatment, you can approach your implant journey with clarity and assurance. Our commitment to education reflects our integrated identity as clinical experts (The Sage) and compassionate caregivers (The Healer).
Learning Objectives
By the end of this module, you will be able to:
- Understand the complete treatment timeline from consultation to final restoration
- Know what to expect at each phase of treatment
- Learn about preparatory procedures and their healing timelines
- Recognize the importance of osseointegration in implant success
- Understand recovery expectations and return to normal activities
- Appreciate the role of patient compliance throughout the journey
3.1 Initial Consultation: Your First Step
What to Expect at Your Consultation
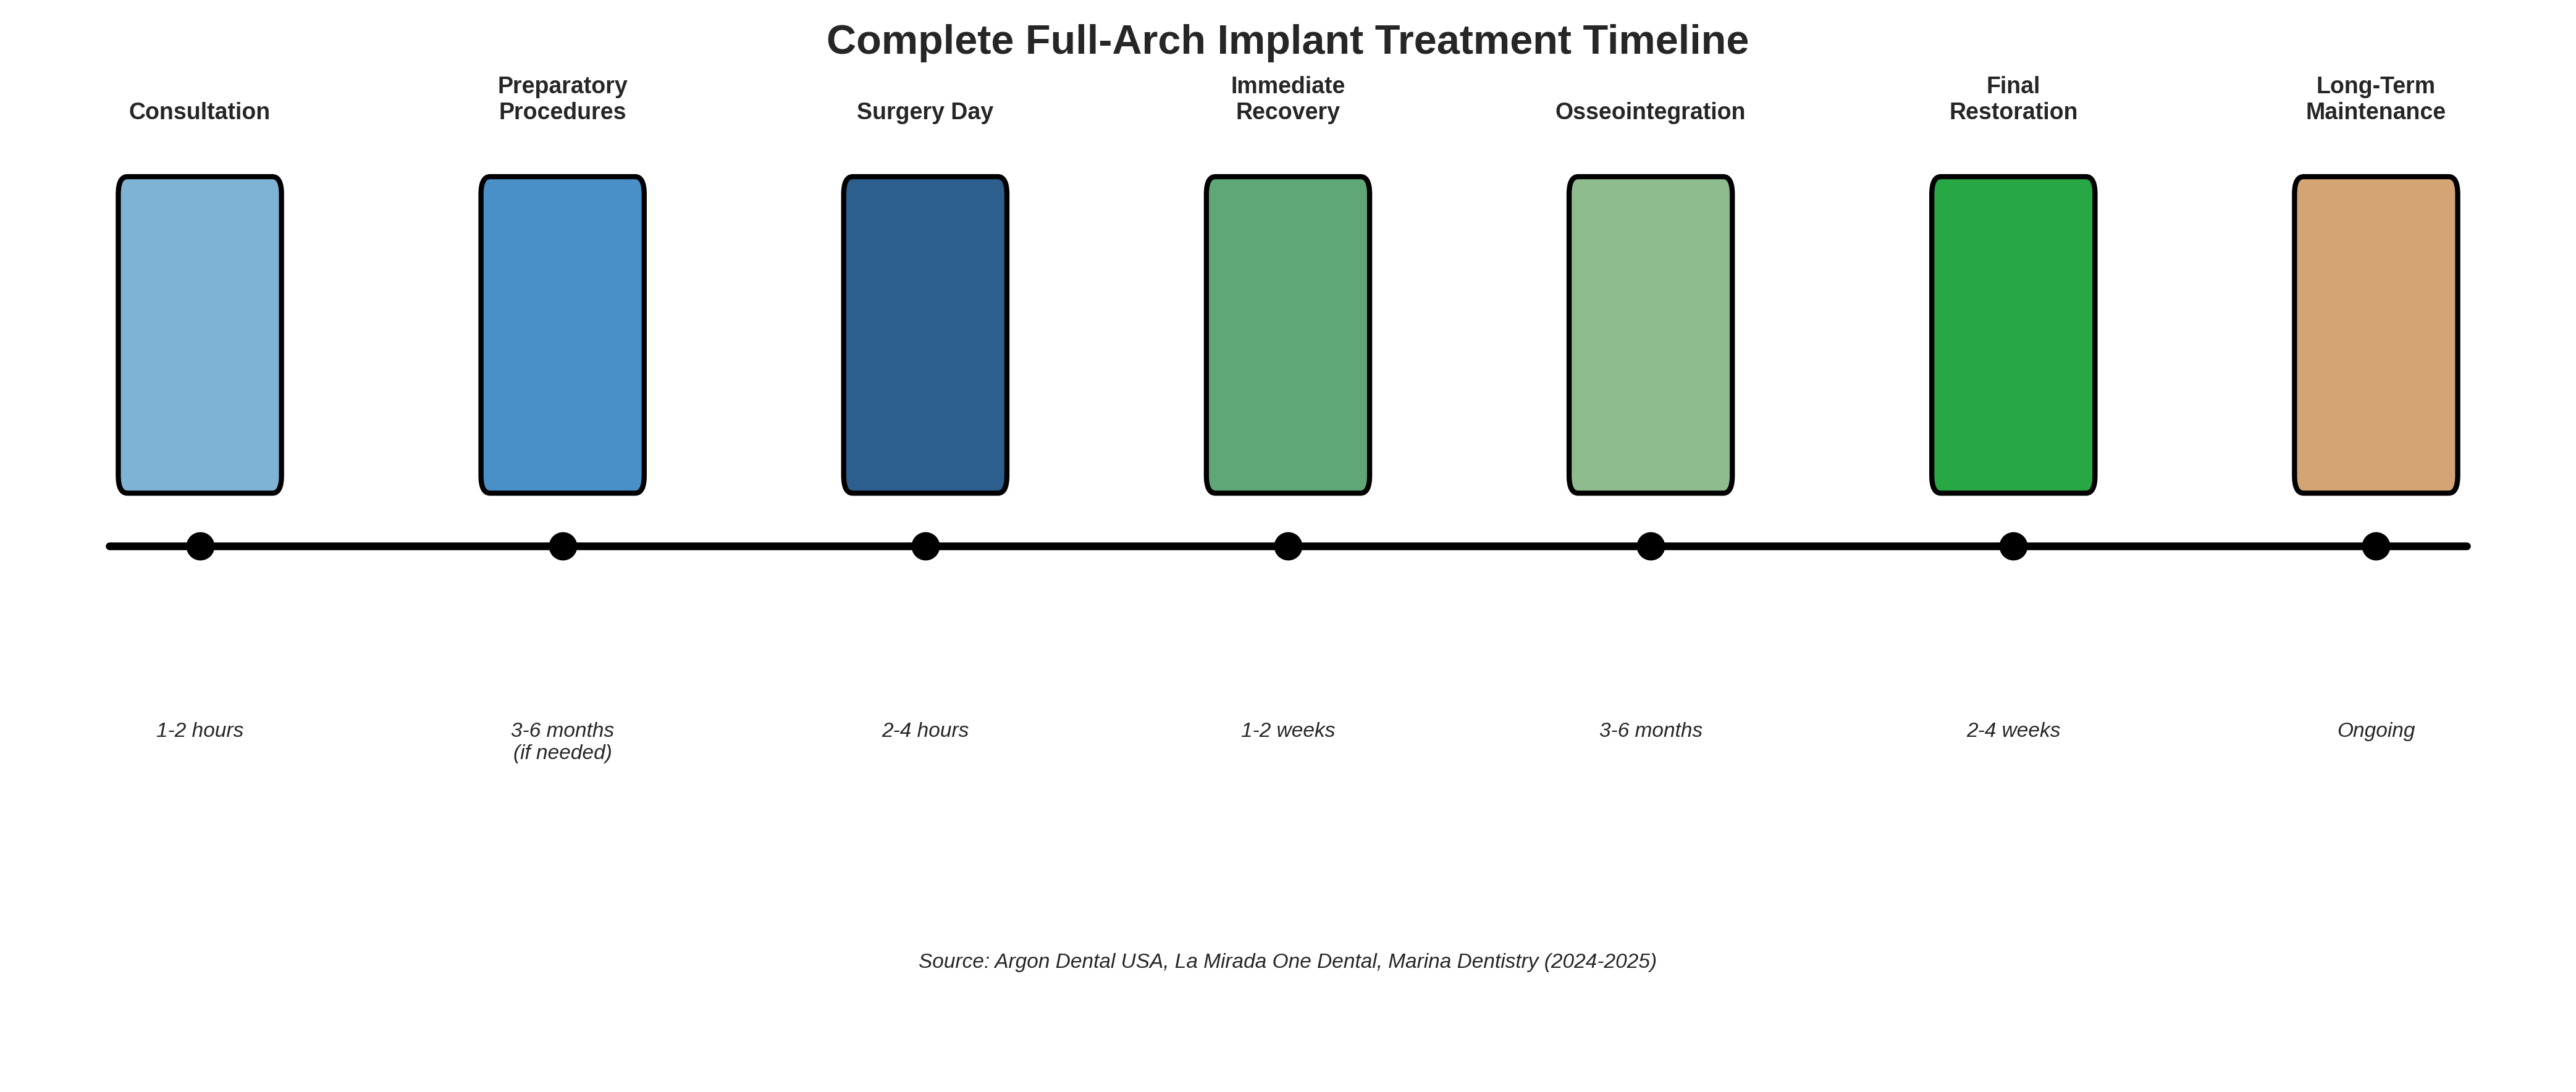
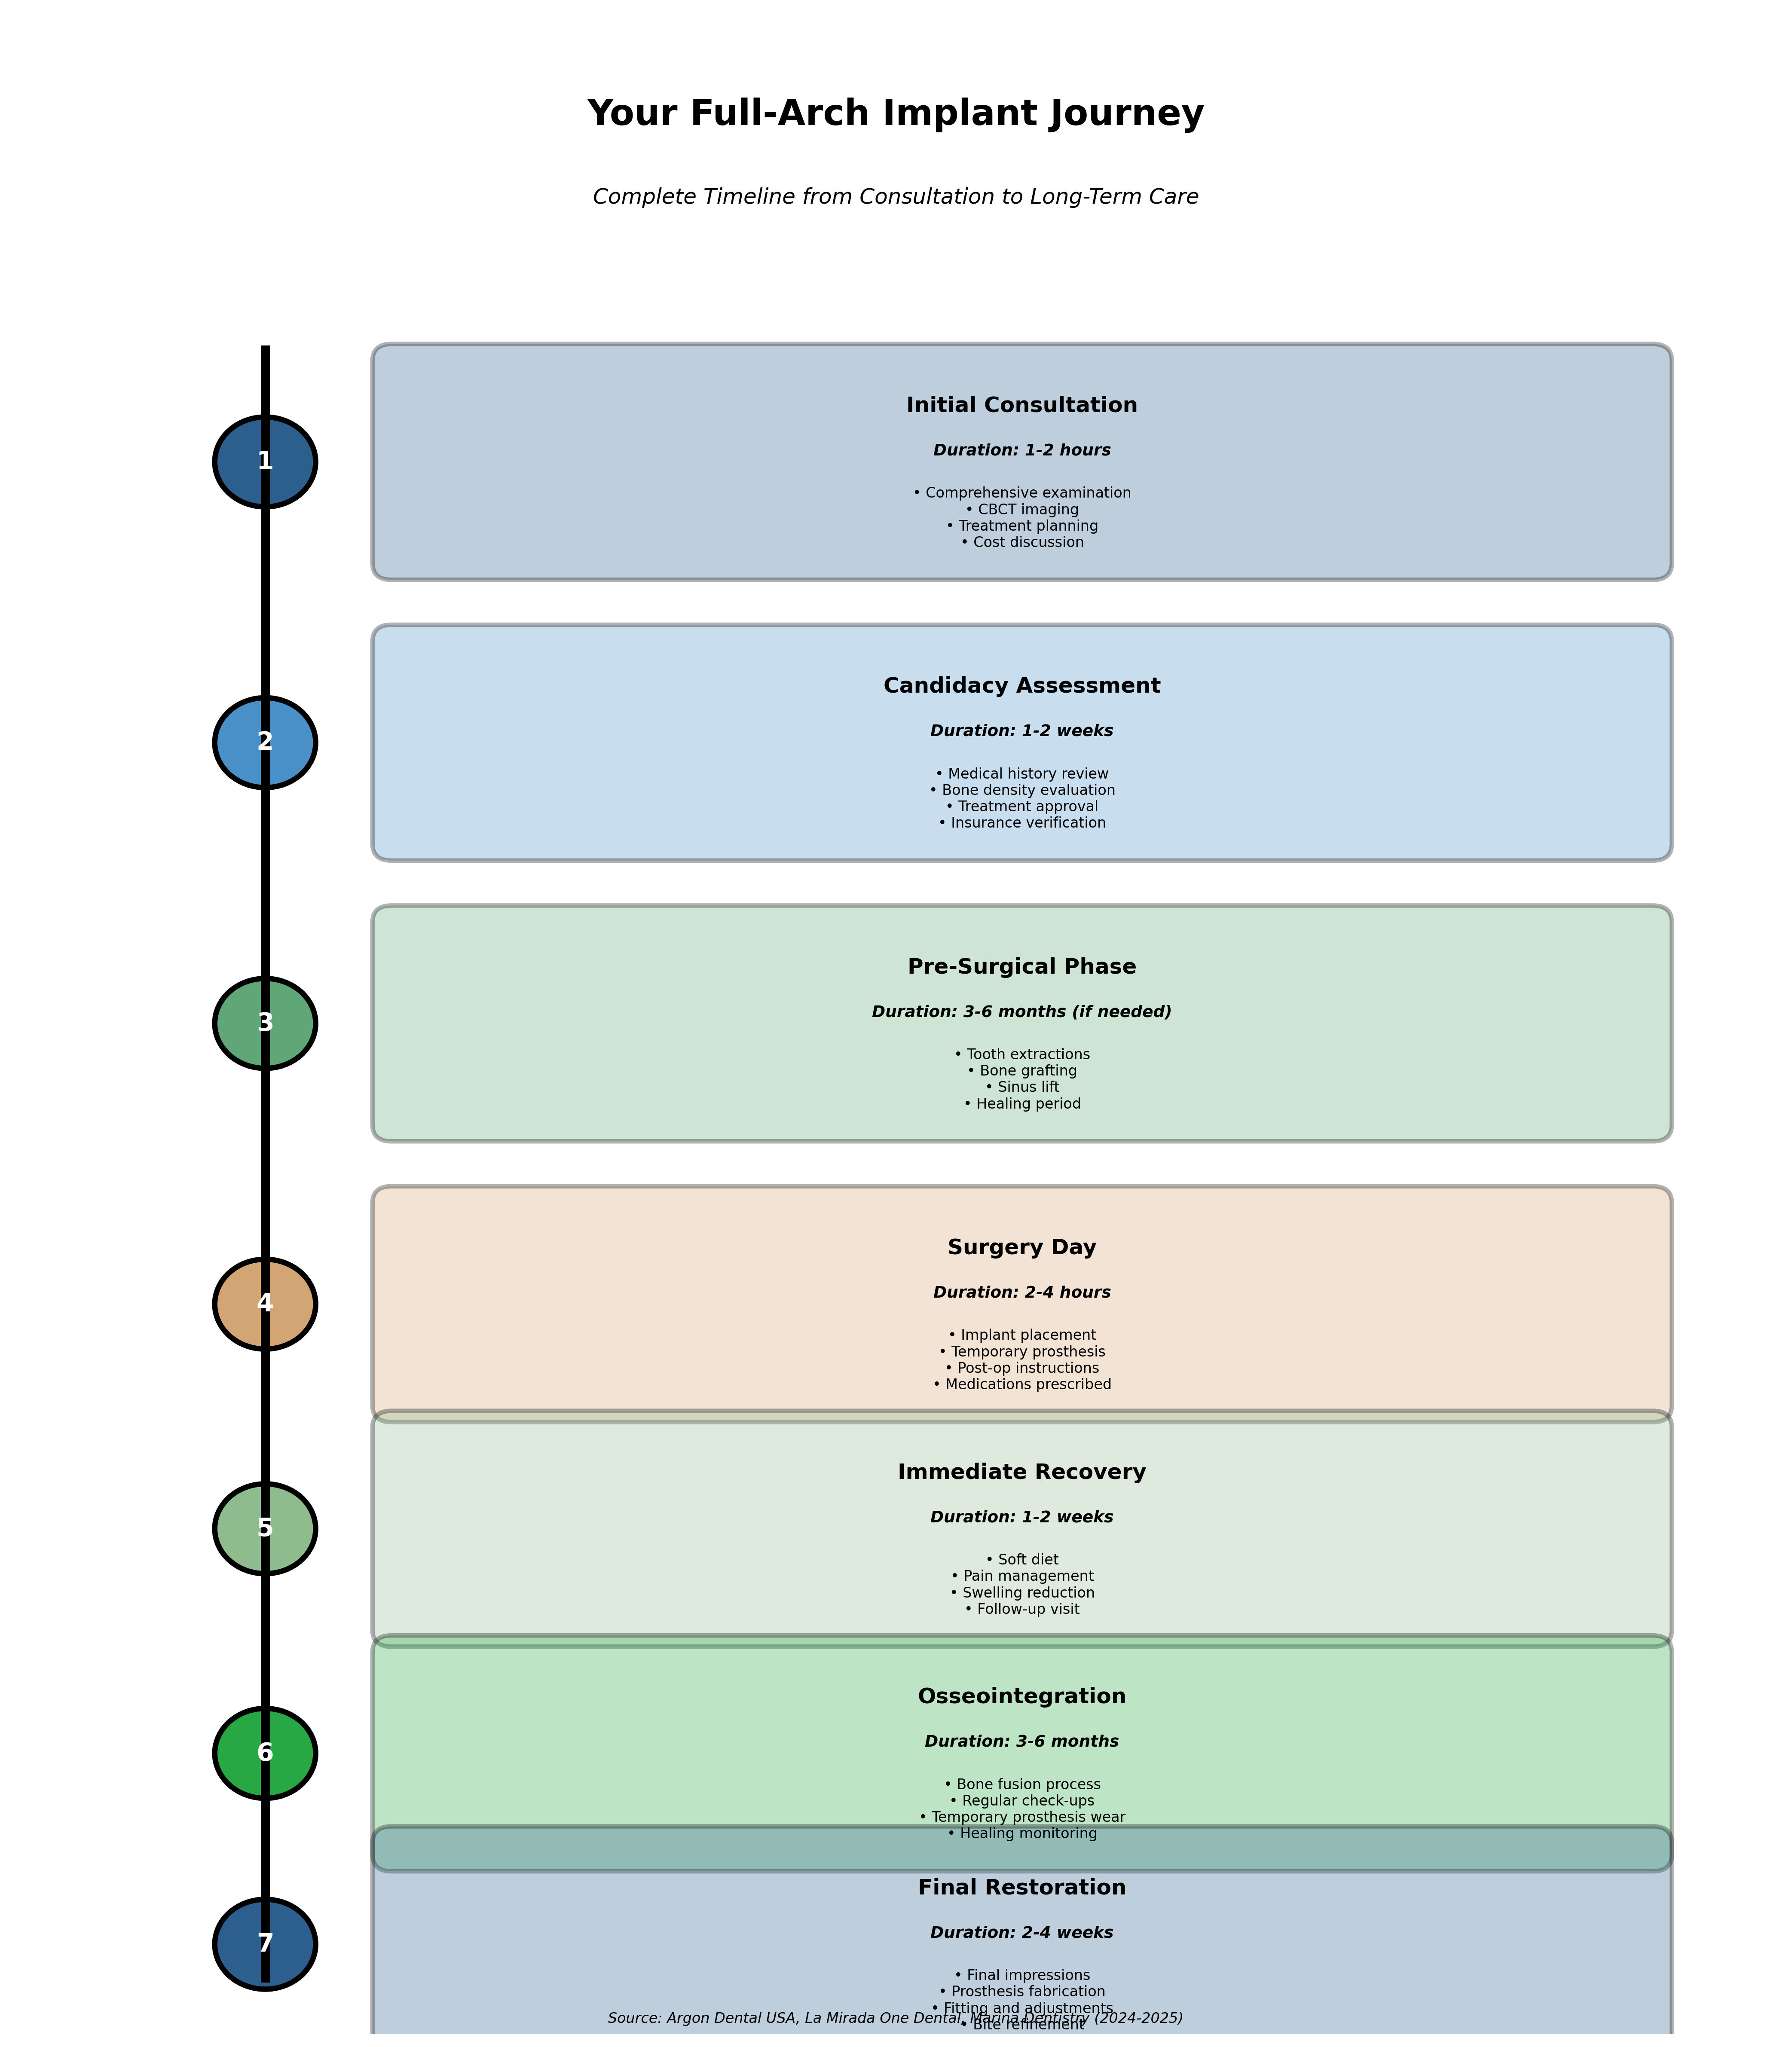
The initial consultation is where your implant journey begins. This comprehensive appointment typically lasts 1-2 hours and serves multiple important purposes: evaluating your candidacy, understanding your goals, explaining treatment options, and developing a preliminary treatment plan.
Comprehensive Oral Examination:Your oral surgeon will conduct a thorough examination of your mouth, teeth, gums, and jaw structure. This includes:
- Assessment of remaining teeth and their condition
- Evaluation of gum health and any periodontal disease
- Examination of bite relationship and jaw alignment
- Inspection of oral tissues for any abnormalities
- Discussion of any current dental problems or concerns
Your overall health significantly impacts implant success, so a comprehensive medical history review is essential:
- Current medications and supplements
- Chronic health conditions (diabetes, heart disease, osteoporosis, etc.)
- Previous surgeries and healing experiences
- Allergies and medication sensitivities
- Lifestyle factors (smoking, alcohol use)
- Family medical history relevant to healing
This is your opportunity to share what you hope to achieve:
- Functional goals (eating, speaking, comfort)
- Aesthetic desires (smile appearance, facial support)
- Timeline preferences and constraints
- Budget considerations
- Concerns and questions
- Previous experiences with dental treatment
Understanding your goals allows your surgeon to tailor treatment recommendations to your specific needs and priorities.
Diagnostic Procedures
Modern implant planning relies on advanced diagnostic technology to ensure optimal outcomes:
CBCT Scan (Cone Beam Computed Tomography):As of 2025, CBCT imaging has become the standard of care for implant planning. This 3D imaging technology provides:
- Detailed visualization of bone structure and density
- Precise measurements of bone height and width
- Identification of anatomical structures (nerves, sinuses, blood vessels)
- Assessment of bone quality throughout the jaw
- Virtual implant placement planning
- Lower radiation exposure compared to medical CT scans
The CBCT scan is painless and typically takes just a few minutes, but the information it provides is invaluable for treatment planning.
Additional Diagnostic Records:- Photographs: Facial and intraoral photos document your starting point and aid in prosthetic design
- Impressions or Digital Scans: Capture the exact shape and relationship of your jaws
- Bite Analysis: Evaluates how your jaws come together and function
- Bone Quality Assessment: Determines bone density and suitability for implant placement
Treatment Options Presentation
Based on your examination and diagnostic records, your surgeon will present treatment options tailored to your situation:
- All-on-4 vs. All-on-6 technique recommendations
- Immediate loading vs. delayed loading protocols
- Prosthetic material options (zirconia vs. acrylic)
- Any preparatory procedures needed
- Alternative treatment approaches if applicable
- Timeline for each option
- Success rates and expected outcomes
This presentation includes visual aids, models, and often computer simulations showing your potential results.
Preliminary Treatment Plan and Cost Estimates
You'll receive a preliminary treatment plan outlining:
- Recommended technique and approach
- Preparatory procedures if needed
- Surgical plan
- Prosthetic design
- Complete timeline
- Detailed cost breakdown
- Insurance coverage estimates
- Financing options
This comprehensive plan gives you everything needed to make an informed decision about proceeding with treatment.
3.2 Candidacy Assessment: Are You a Good Candidate?
Ideal Candidate Characteristics
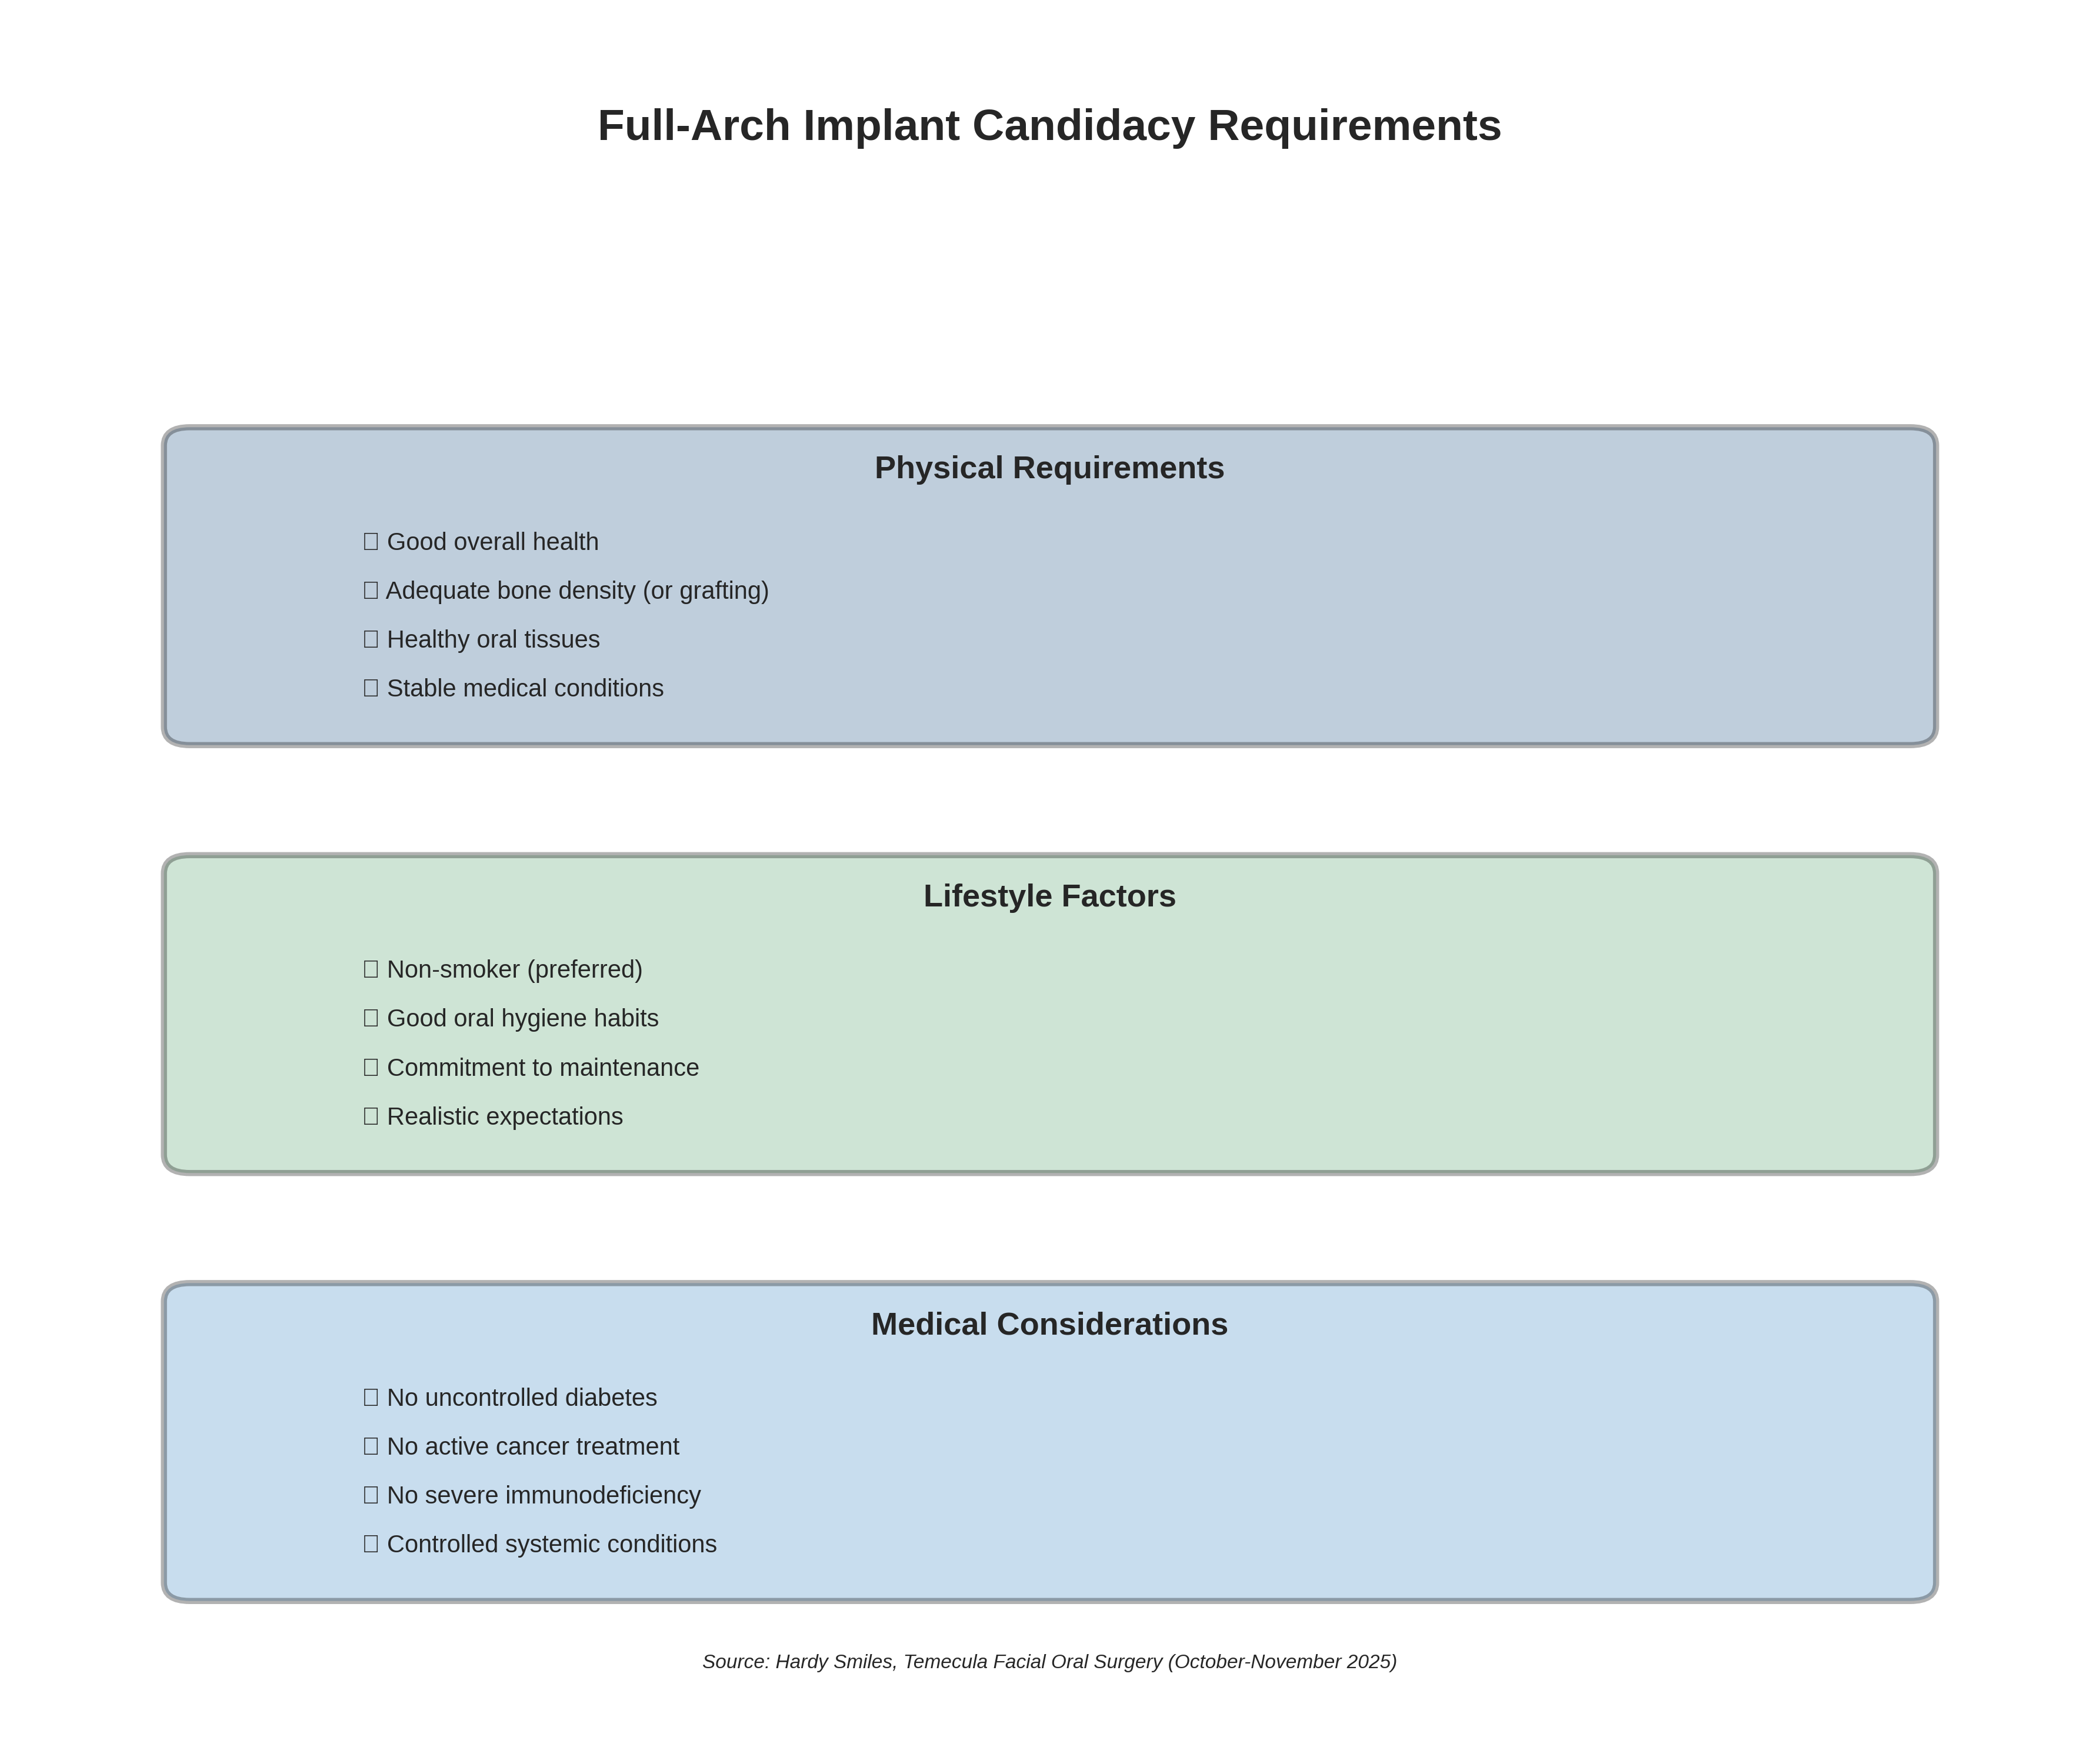
Understanding what makes someone a good candidate for full-arch implants helps set appropriate expectations:
Physical Requirements: Good Overall Health (Required):Your body's ability to heal and integrate the implants depends on overall health status. This doesn't mean you must be in perfect health, but major systemic conditions should be well-managed. The healing process requires your body's natural repair mechanisms to work effectively.
Adequate Bone Density:Sufficient bone density and volume are necessary to support the implants. However, even patients with some bone loss may be candidates, as preparatory procedures like bone grafting can create the necessary foundation. Advanced CBCT imaging allows precise assessment of bone quality and quantity.
Healthy Oral Tissues:Gums and other oral tissues should be healthy or treatable. Active periodontal disease must be addressed before implant placement, but once treated, patients can proceed with implant treatment.
Lifestyle Factors: Non-Smoker Preference:Smoking significantly reduces implant success rates. While smokers can receive implants, outcomes are substantially better for non-smokers. Many surgeons require smoking cessation before and after surgery to optimize healing.
Good Oral Hygiene Habits:Long-term implant success requires commitment to daily oral hygiene. Patients must be willing to maintain proper cleaning routines and attend regular professional maintenance appointments.
Commitment to Long-Term Maintenance:Full-arch implants require ongoing care, including professional cleanings every 3-4 months during the first year and every 6 months thereafter. Candidates must be willing to commit to this long-term maintenance schedule.
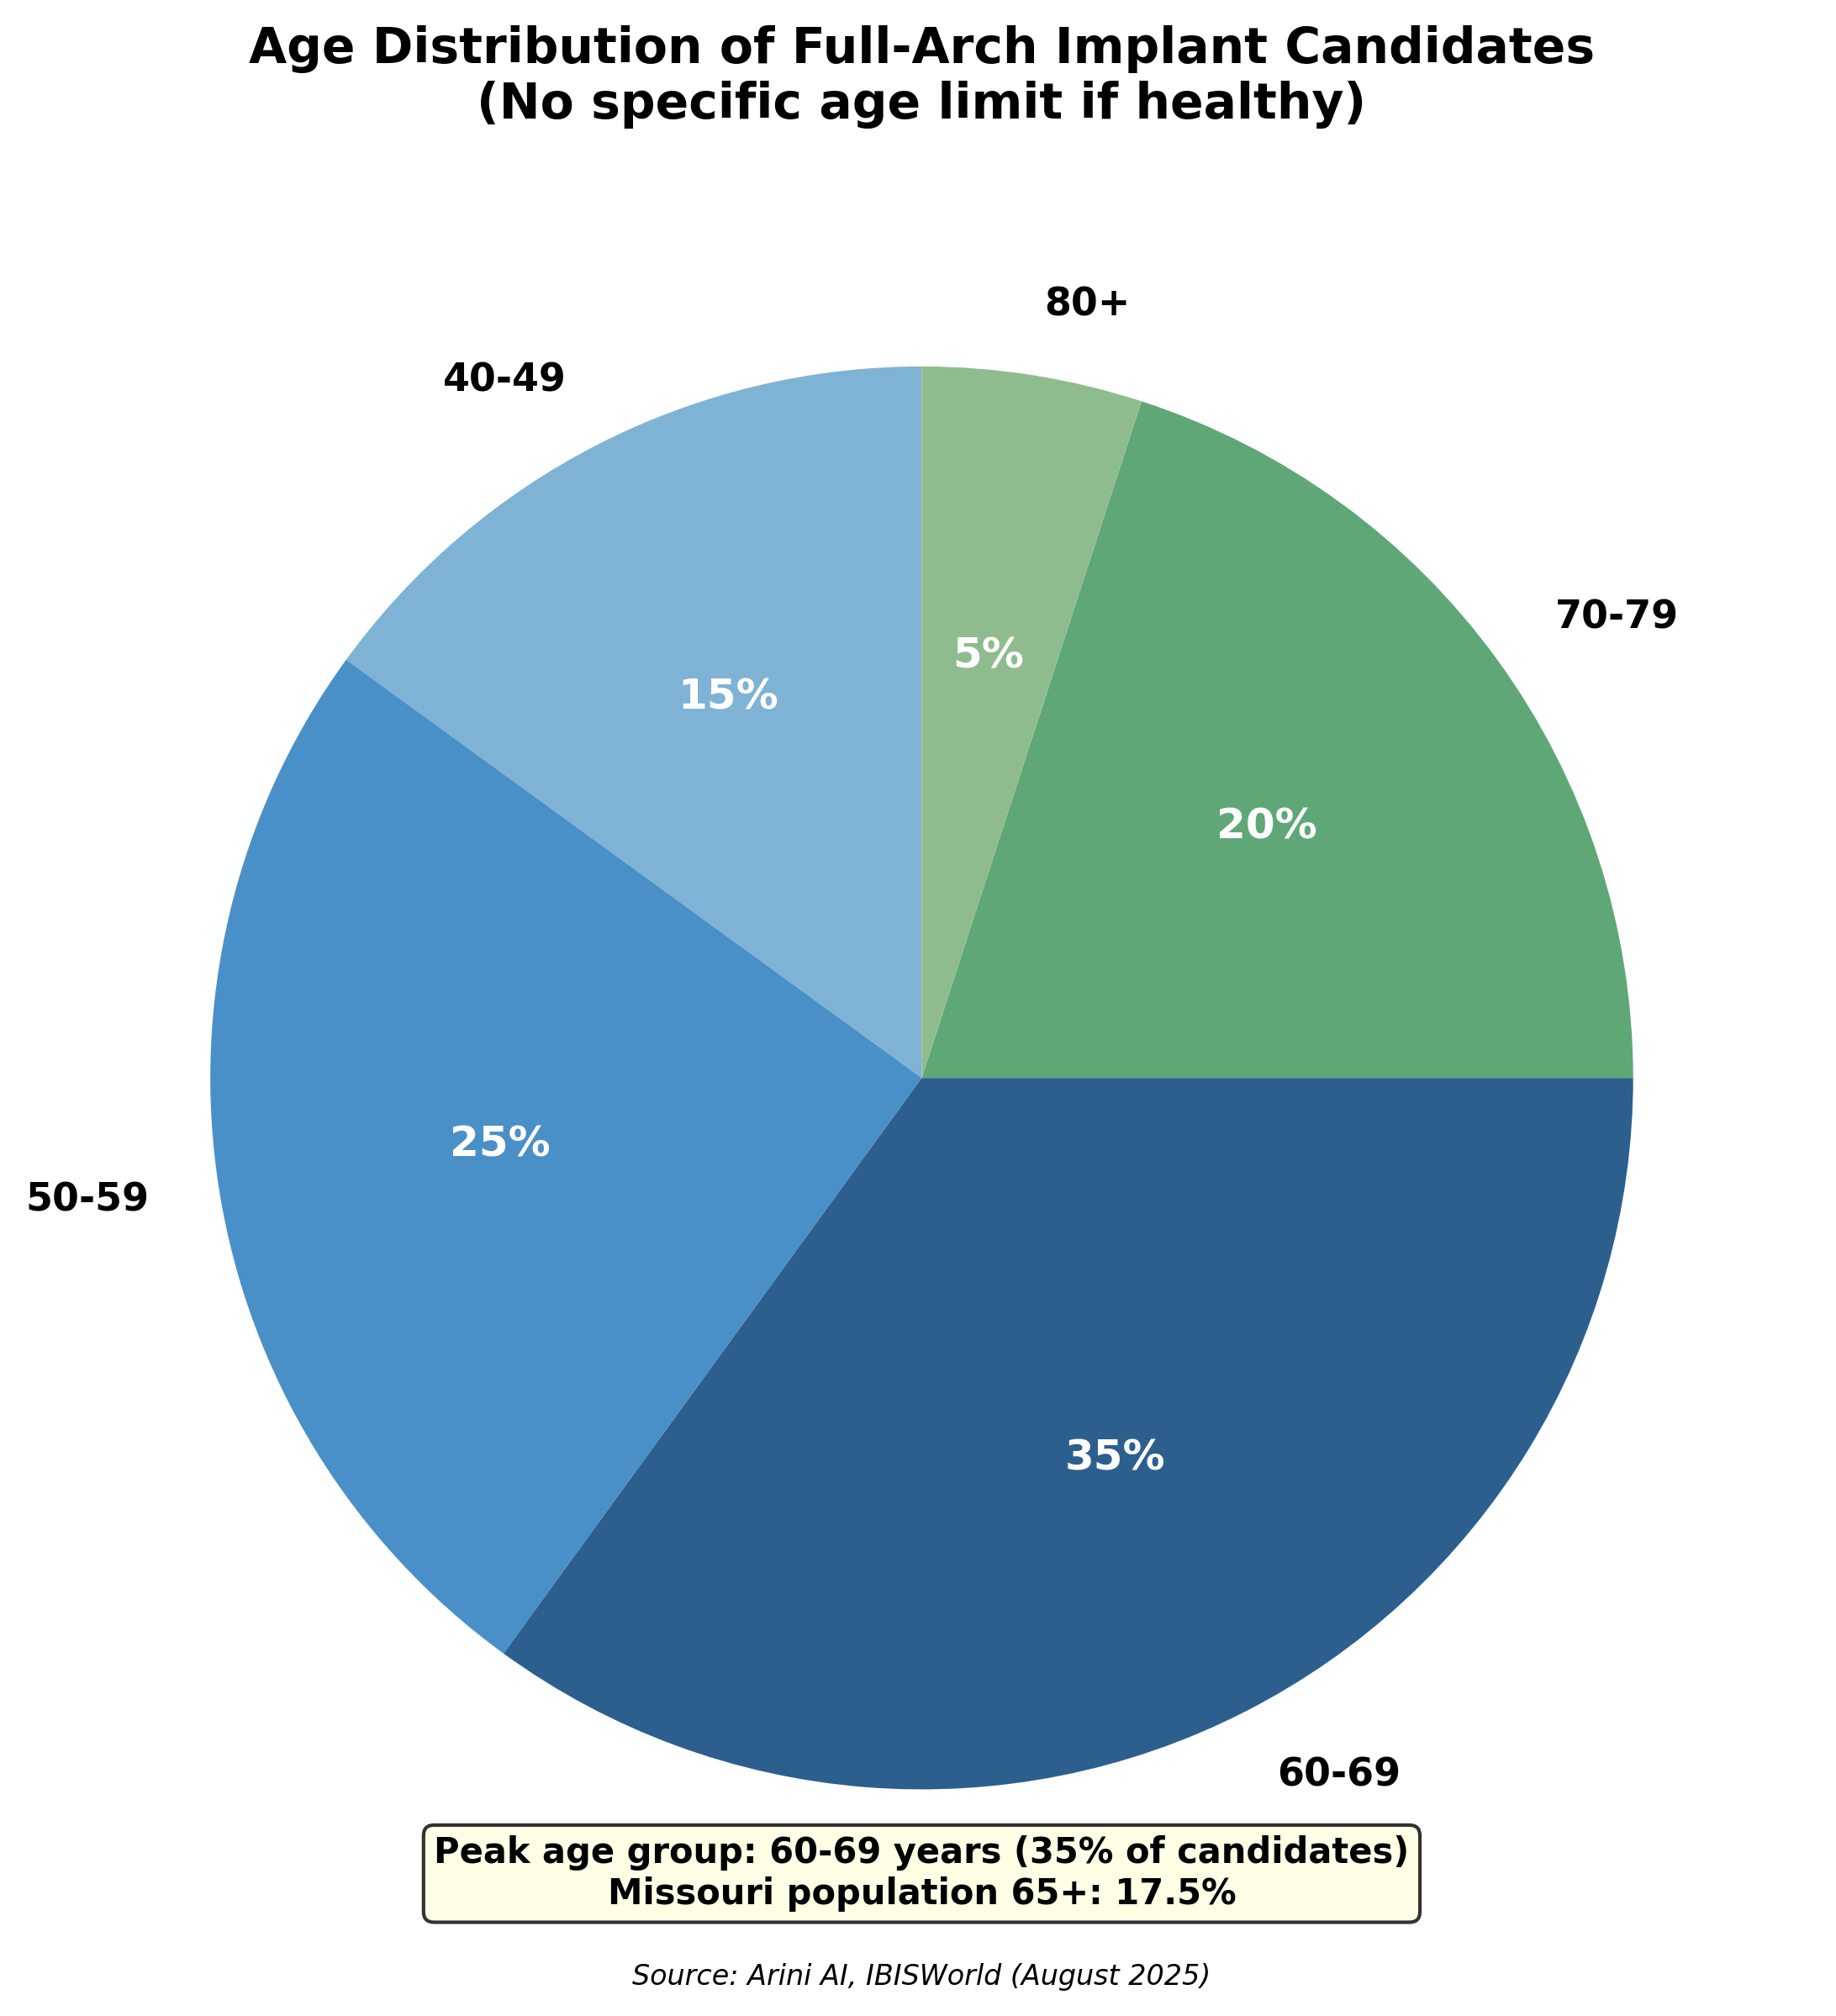
No Specific Age Limit:Age alone doesn't disqualify candidates. As long as you're in reasonably good health, full-arch implants can be successful at any age. Both younger patients with congenital tooth absence and older patients with age-related tooth loss can be excellent candidates.
Medical Contraindications
Certain medical conditions may affect candidacy or require special management:
Absolute Contraindications:These conditions typically preclude implant treatment or require resolution before proceeding:
- Uncontrolled Diabetes: HbA1c levels above 7-8% significantly impair healing and increase infection risk
- Active Cancer Treatment: Patients undergoing active cancer treatment or within the last five years (in some cases) may not be candidates
- Severe Immunodeficiency: Conditions that severely compromise immune function affect healing
- Recent Radiation Therapy: Radiation to the jaw area can impair bone healing and integration
- Certain Bone Disorders: Conditions affecting bone metabolism and healing
These conditions require careful evaluation and management but don't necessarily preclude treatment:
- Controlled Diabetes: Patients with well-controlled diabetes (HbA1c < 7%) can be successful candidates with careful management
- Chronic Kidney Disease: Requires evaluation and coordination with nephrologist
- Active Periodontal Disease: Must be treated before implant placement
- Pregnancy: Elective surgery is postponed until after pregnancy and nursing
- Osteoporosis: Requires evaluation; bone density medications may need adjustment
- Bisphosphonate Therapy: Requires careful evaluation due to potential healing complications
- Heavy Smoking: Significantly reduces success rates; cessation strongly recommended
- Alcohol Abuse: Impairs healing and compliance with post-operative care
- Tobacco Use (All Forms): Chewing tobacco and other forms also negatively impact outcomes
- Poor Oral Hygiene: Inability or unwillingness to maintain proper hygiene
- Inability to Commit to Maintenance: Long-term success requires ongoing professional care
The Candidacy Evaluation Process
Your surgeon evaluates all these factors together to determine your candidacy:
- Medical Assessment: Review of health history and current conditions
- Clinical Examination: Evaluation of oral health and bone structure
- Diagnostic Analysis: Review of CBCT scans and other imaging
- Risk Assessment: Identification of factors that might affect success
- Optimization Opportunities: Recommendations for improving candidacy (smoking cessation, diabetes control, etc.)
- Personalized Recommendation: Clear guidance on whether you're a candidate and any preparatory steps needed
3.3 Pre-Surgical Phase: Preparing for Success
Preparatory Procedures When Needed
Not all patients require preparatory procedures, but when needed, they create the foundation for successful implant placement:
Tooth Extractions:If you have remaining teeth that need removal:
- Healing Timeline: 3-6 months typically required before implant placement
- Socket Preservation: Bone grafting may be performed at extraction to preserve bone volume
- Immediate Implants: In some cases, implants can be placed immediately after extraction
- Staged Approach: Multiple extractions may be staged for patient comfort
When bone volume or density is insufficient:
- Purpose: Augment bone to create adequate foundation for implants
- Types of Grafts:
- Autografts (your own bone) - Allografts (donor bone) - Xenografts (animal-derived bone) - Alloplastic materials (synthetic bone substitutes)
- Healing Timeline: 4-6 months typically required for adequate bone formation
- Success Rates: High success rates with modern grafting materials and techniques
For upper jaw implants when sinus proximity is an issue:
Purpose:Increase bone height and width in the upper jaw by lifting the sinus membrane and placing bone graft material beneath it. This creates adequate bone volume for successful dental implant placement in the posterior maxilla.
Procedure Details:- Creating a small window in the bone near the sinus
- Gently lifting the sinus membrane upward
- Packing bone graft material between the sinus membrane and sinus floor
- Allowing healing period for bone integration
Sinus lifts are one of the most common bone grafting procedures for patients with upper jaw bone loss. This procedure enables dental reconstruction in cases of significant bone deficiency in the posterior upper jaw.
Timing:- One-Stage Approach: Sinus lift performed simultaneously with implant placement
- Two-Stage Approach: Sinus lift performed first, with 4-6 months healing before implant placement
- Decision Factors: Amount of existing bone and surgeon preference determine approach
Patient Preparation
Beyond surgical procedures, preparing yourself for surgery optimizes outcomes:
Medical Optimization:- Diabetes Control: Achieve HbA1c below 7% if diabetic
- Blood Pressure Management: Ensure hypertension is well-controlled
- Medication Adjustments: Some medications may need temporary adjustment (blood thinners, bisphosphonates, etc.)
- Nutritional Status: Good nutrition supports healing
- Overall Health: Address any acute health issues before elective surgery
If you smoke, cessation is strongly recommended:
- Ideal Timeline: Stop smoking at least 2 weeks before surgery
- Continue Abstinence: Avoid smoking for at least 8 weeks after surgery
- Long-Term Benefits: Permanent cessation provides best long-term outcomes
- Support Resources: Smoking cessation programs and medications can help
Your surgeon will provide specific instructions:
- Fasting Requirements: Typically nothing to eat or drink after midnight before surgery
- Medication Guidelines: Which medications to take or avoid
- Transportation: Arrange for someone to drive you home
- Recovery Support: Have someone available to assist you for 24-48 hours
- Home Preparation: Stock soft foods, ice packs, and prescribed medications
- Take time off work (typically 2-3 days minimum)
- Arrange childcare or pet care if needed
- Prepare comfortable recovery space at home
- Have soft foods and beverages ready
- Ensure prescriptions are filled before surgery
- Plan for follow-up appointments
3.4 Surgical Phase: The Day of Your Procedure
Day of Surgery
Understanding what happens on surgery day helps reduce anxiety and ensures you're prepared:
Anesthesia Administration:Most full-arch implant procedures use IV sedation or general anesthesia:
- IV Sedation: Twilight sleep where you're relaxed and comfortable but can respond to instructions
- General Anesthesia: Complete unconsciousness for complex cases or patient preference
- Local Anesthesia: Always used in addition to sedation for complete numbness
- Monitoring: Vital signs continuously monitored throughout procedure
- Safety: Administered by experienced anesthesia professionals
The surgical procedure typically takes 2-4 hours:
- Surgical Access: Incisions made to access jawbone
- Site Preparation: Precise drilling to create implant sites
- Implant Placement: Four or six implants placed according to pre-surgical plan
- Stability Verification: Each implant checked for adequate primary stability
- Abutment Attachment: Connecting pieces attached to implants
- Suturing: Incisions closed with dissolvable or removable sutures
If you're receiving same-day teeth:
- Prosthesis Attachment: Pre-fabricated temporary teeth attached to implants
- Bite Adjustment: Ensuring proper fit and comfortable bite
- Aesthetic Verification: Checking appearance and patient satisfaction
- Instructions: Specific care instructions for temporary prosthesis
Before leaving, you'll receive comprehensive instructions:
- Medication Schedule: Pain management and antibiotics
- Dietary Guidelines: Soft food requirements
- Oral Hygiene: Gentle cleaning techniques
- Activity Restrictions: Rest and limited activity recommendations
- Ice Application: Reducing swelling
- Warning Signs: When to call the office
- Follow-Up Schedule: Next appointment timing
You'll spend time in recovery before going home:
- Vital Signs: Monitored until stable
- Alertness: Ensuring you're awake and responsive
- Comfort: Pain management initiated
- Instructions Review: Caregiver receives all instructions
- Discharge: Released to responsible adult
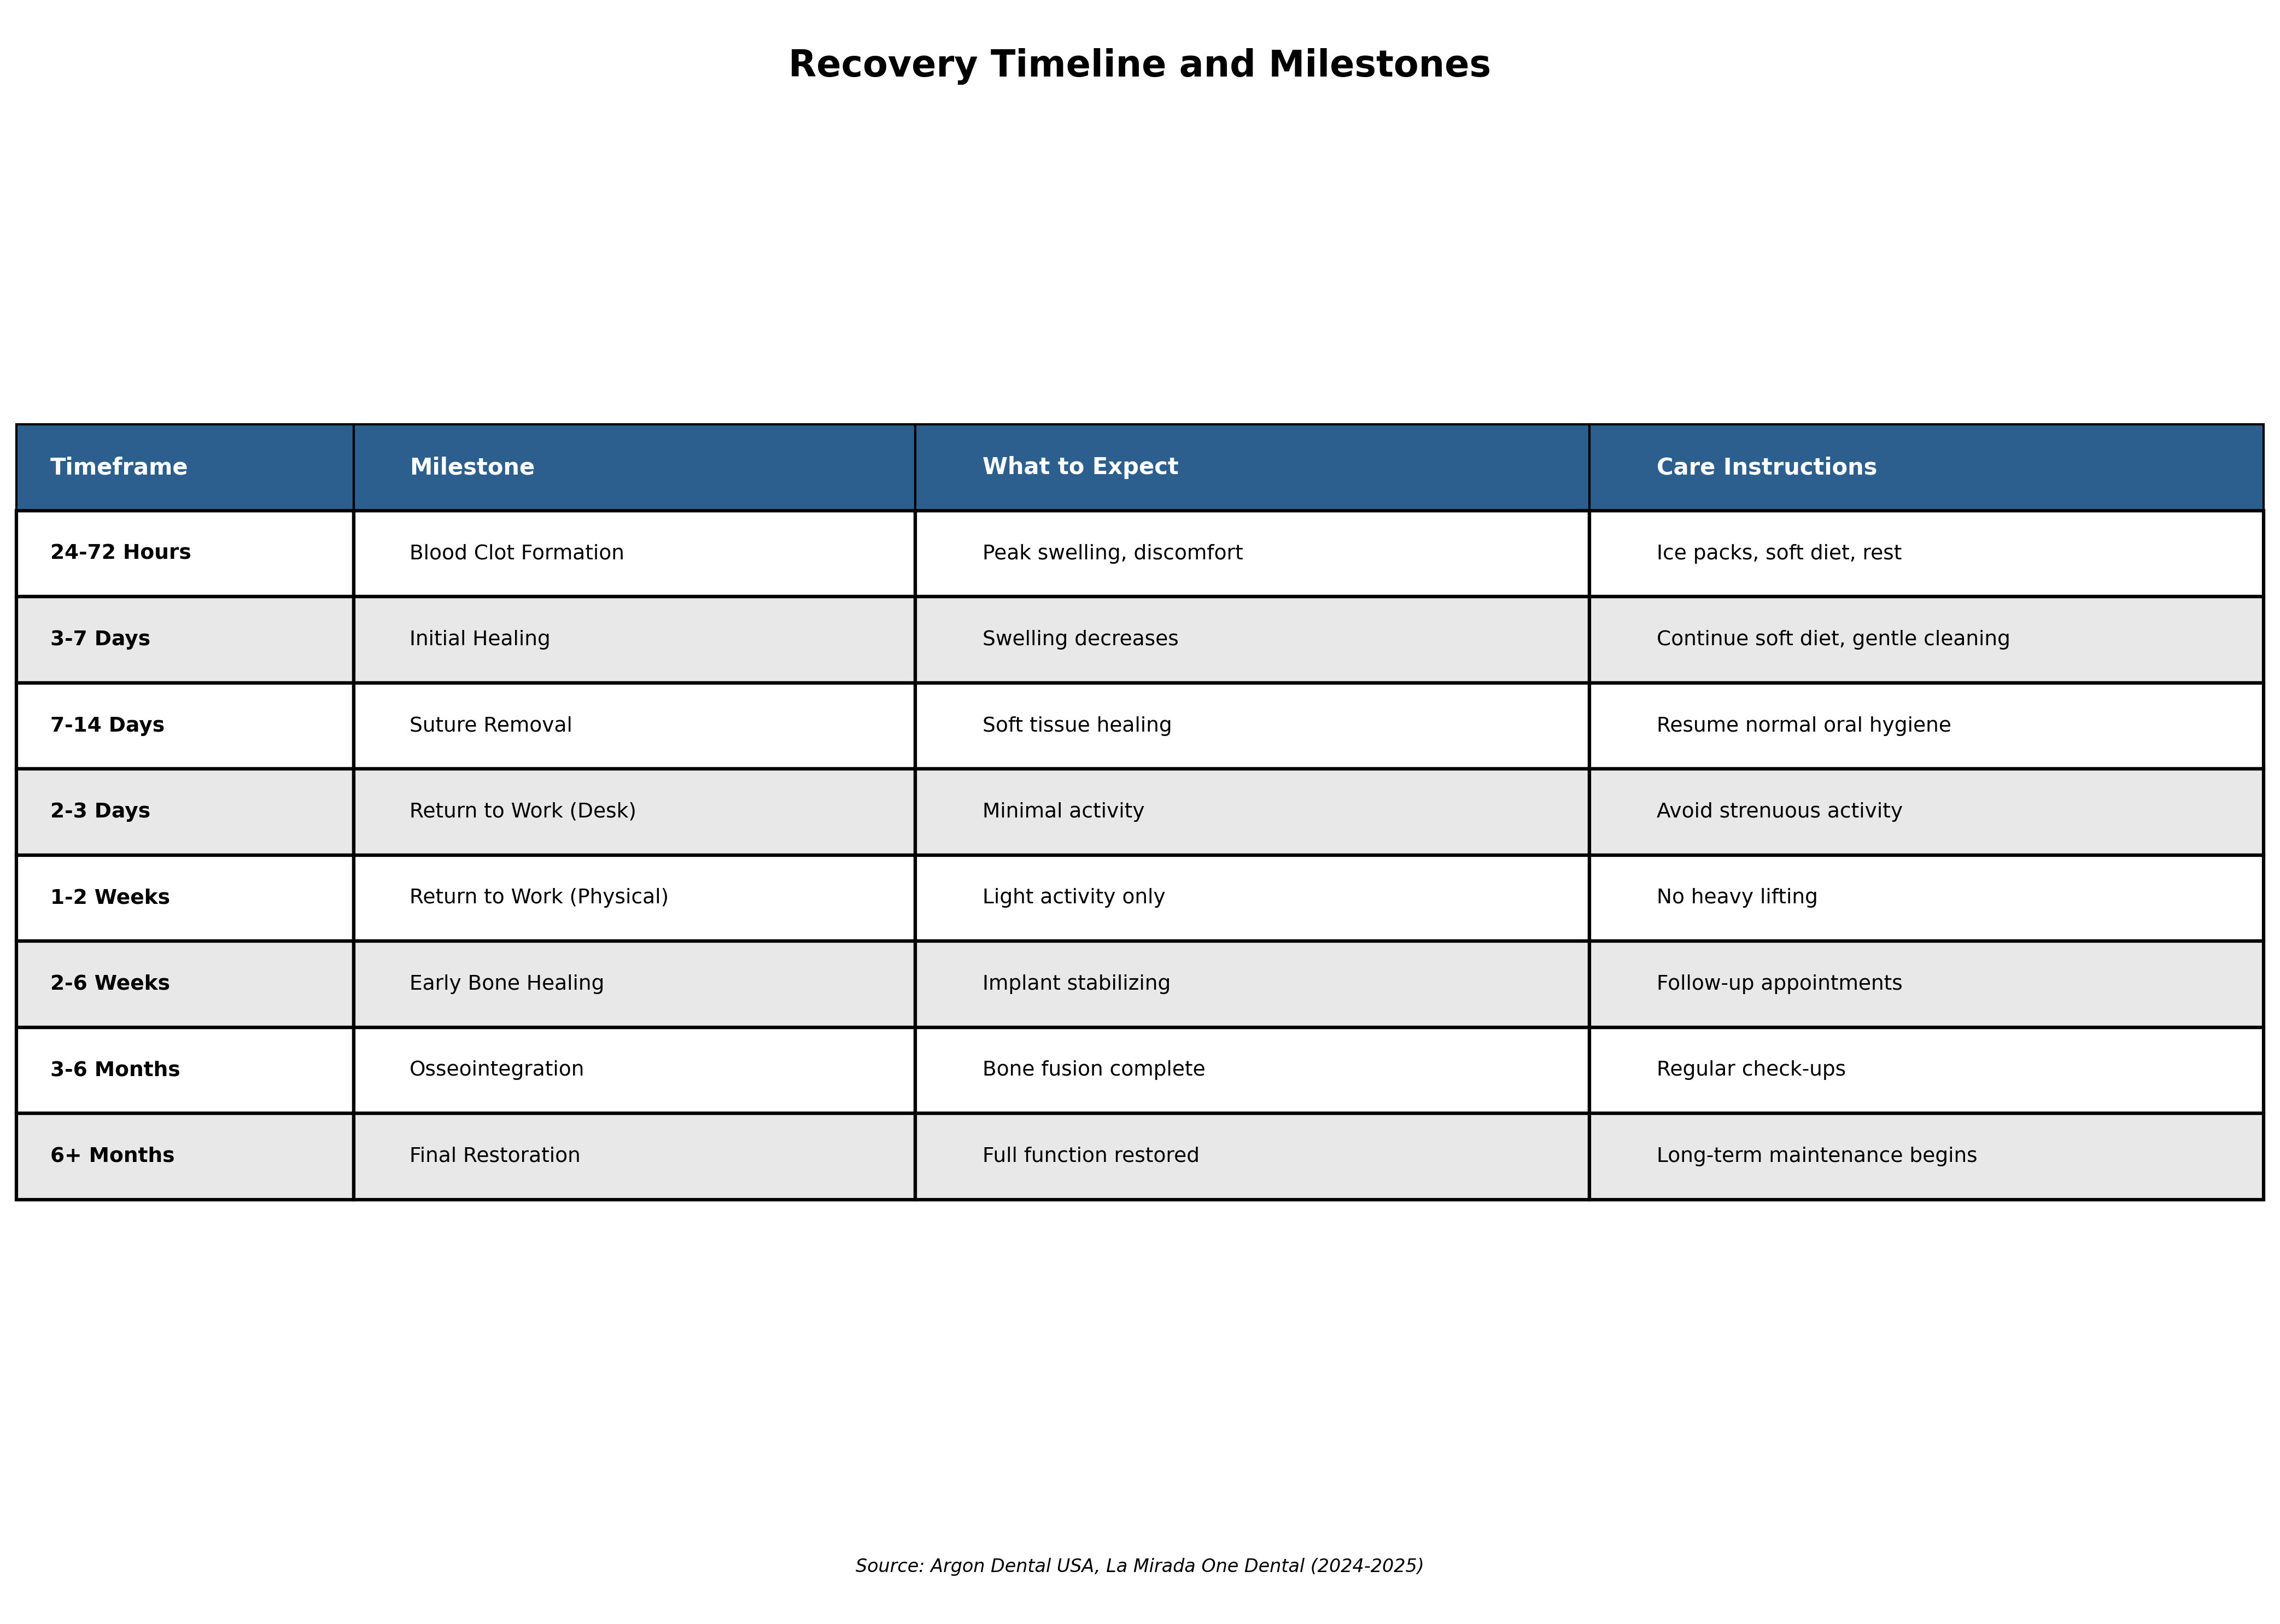
Immediate Post-Operative Period (24-72 Hours)
The first three days after surgery are the most critical for initial healing:
Blood Clot Formation (24-72 Hours):Blood clots form at the surgery sites, beginning the healing process. Protecting these clots is essential:
- Avoid disturbing surgical sites
- No spitting, sucking through straws, or smoking
- Gentle rinsing only after 24 hours
- Soft diet to avoid disrupting clots
Swelling and discomfort typically peak at 48-72 hours after surgery:
- Swelling: Normal and expected; ice application helps
- Discomfort: Managed with prescribed pain medication
- Bruising: May appear on face and neck; normal
- Limited Mouth Opening: Temporary; improves within days
- Rest: Limit activity for first 48-72 hours
- Ice Application: 20 minutes on, 20 minutes off for first 48 hours
- Soft Diet: Protein shakes, smoothies, soups, soft foods
- Hydration: Plenty of fluids
- Medication Compliance: Take all medications as prescribed
- Sleep Position: Head elevated to reduce swelling
First Two Weeks: Early Healing
Soft Tissue Healing:During the first two weeks, soft tissues begin healing:
- Swelling Reduction: Gradual decrease in swelling
- Discomfort Improvement: Pain typically resolves within 3-5 days
- Incision Healing: Surgical sites close and begin healing
- Bruising Resolution: Any bruising fades
If non-dissolvable sutures were used, they're removed at a follow-up appointment:
- Quick Procedure: Takes just a few minutes
- Minimal Discomfort: Usually painless
- Healing Assessment: Surgeon evaluates healing progress
- Questions Addressed: Opportunity to discuss any concerns
- Week 1: Very soft foods (protein shakes, smoothies, soups, yogurt, pudding)
- Week 2: Soft foods (scrambled eggs, mashed potatoes, soft pasta, ground meat)
- Gradual Expansion: Slowly add foods as comfort allows
- Avoid: Hard, crunchy, sticky, or chewy foods during initial healing
- Work: Desk job typically 2-3 days; physical labor 1-2 weeks
- Light Exercise: Walking after 1 week
- Full Exercise: 2-3 weeks with surgeon approval
- Normal Activities: Gradual return as comfort allows
3.5 Healing and Osseointegration Phase: The Critical Period
Understanding Osseointegration
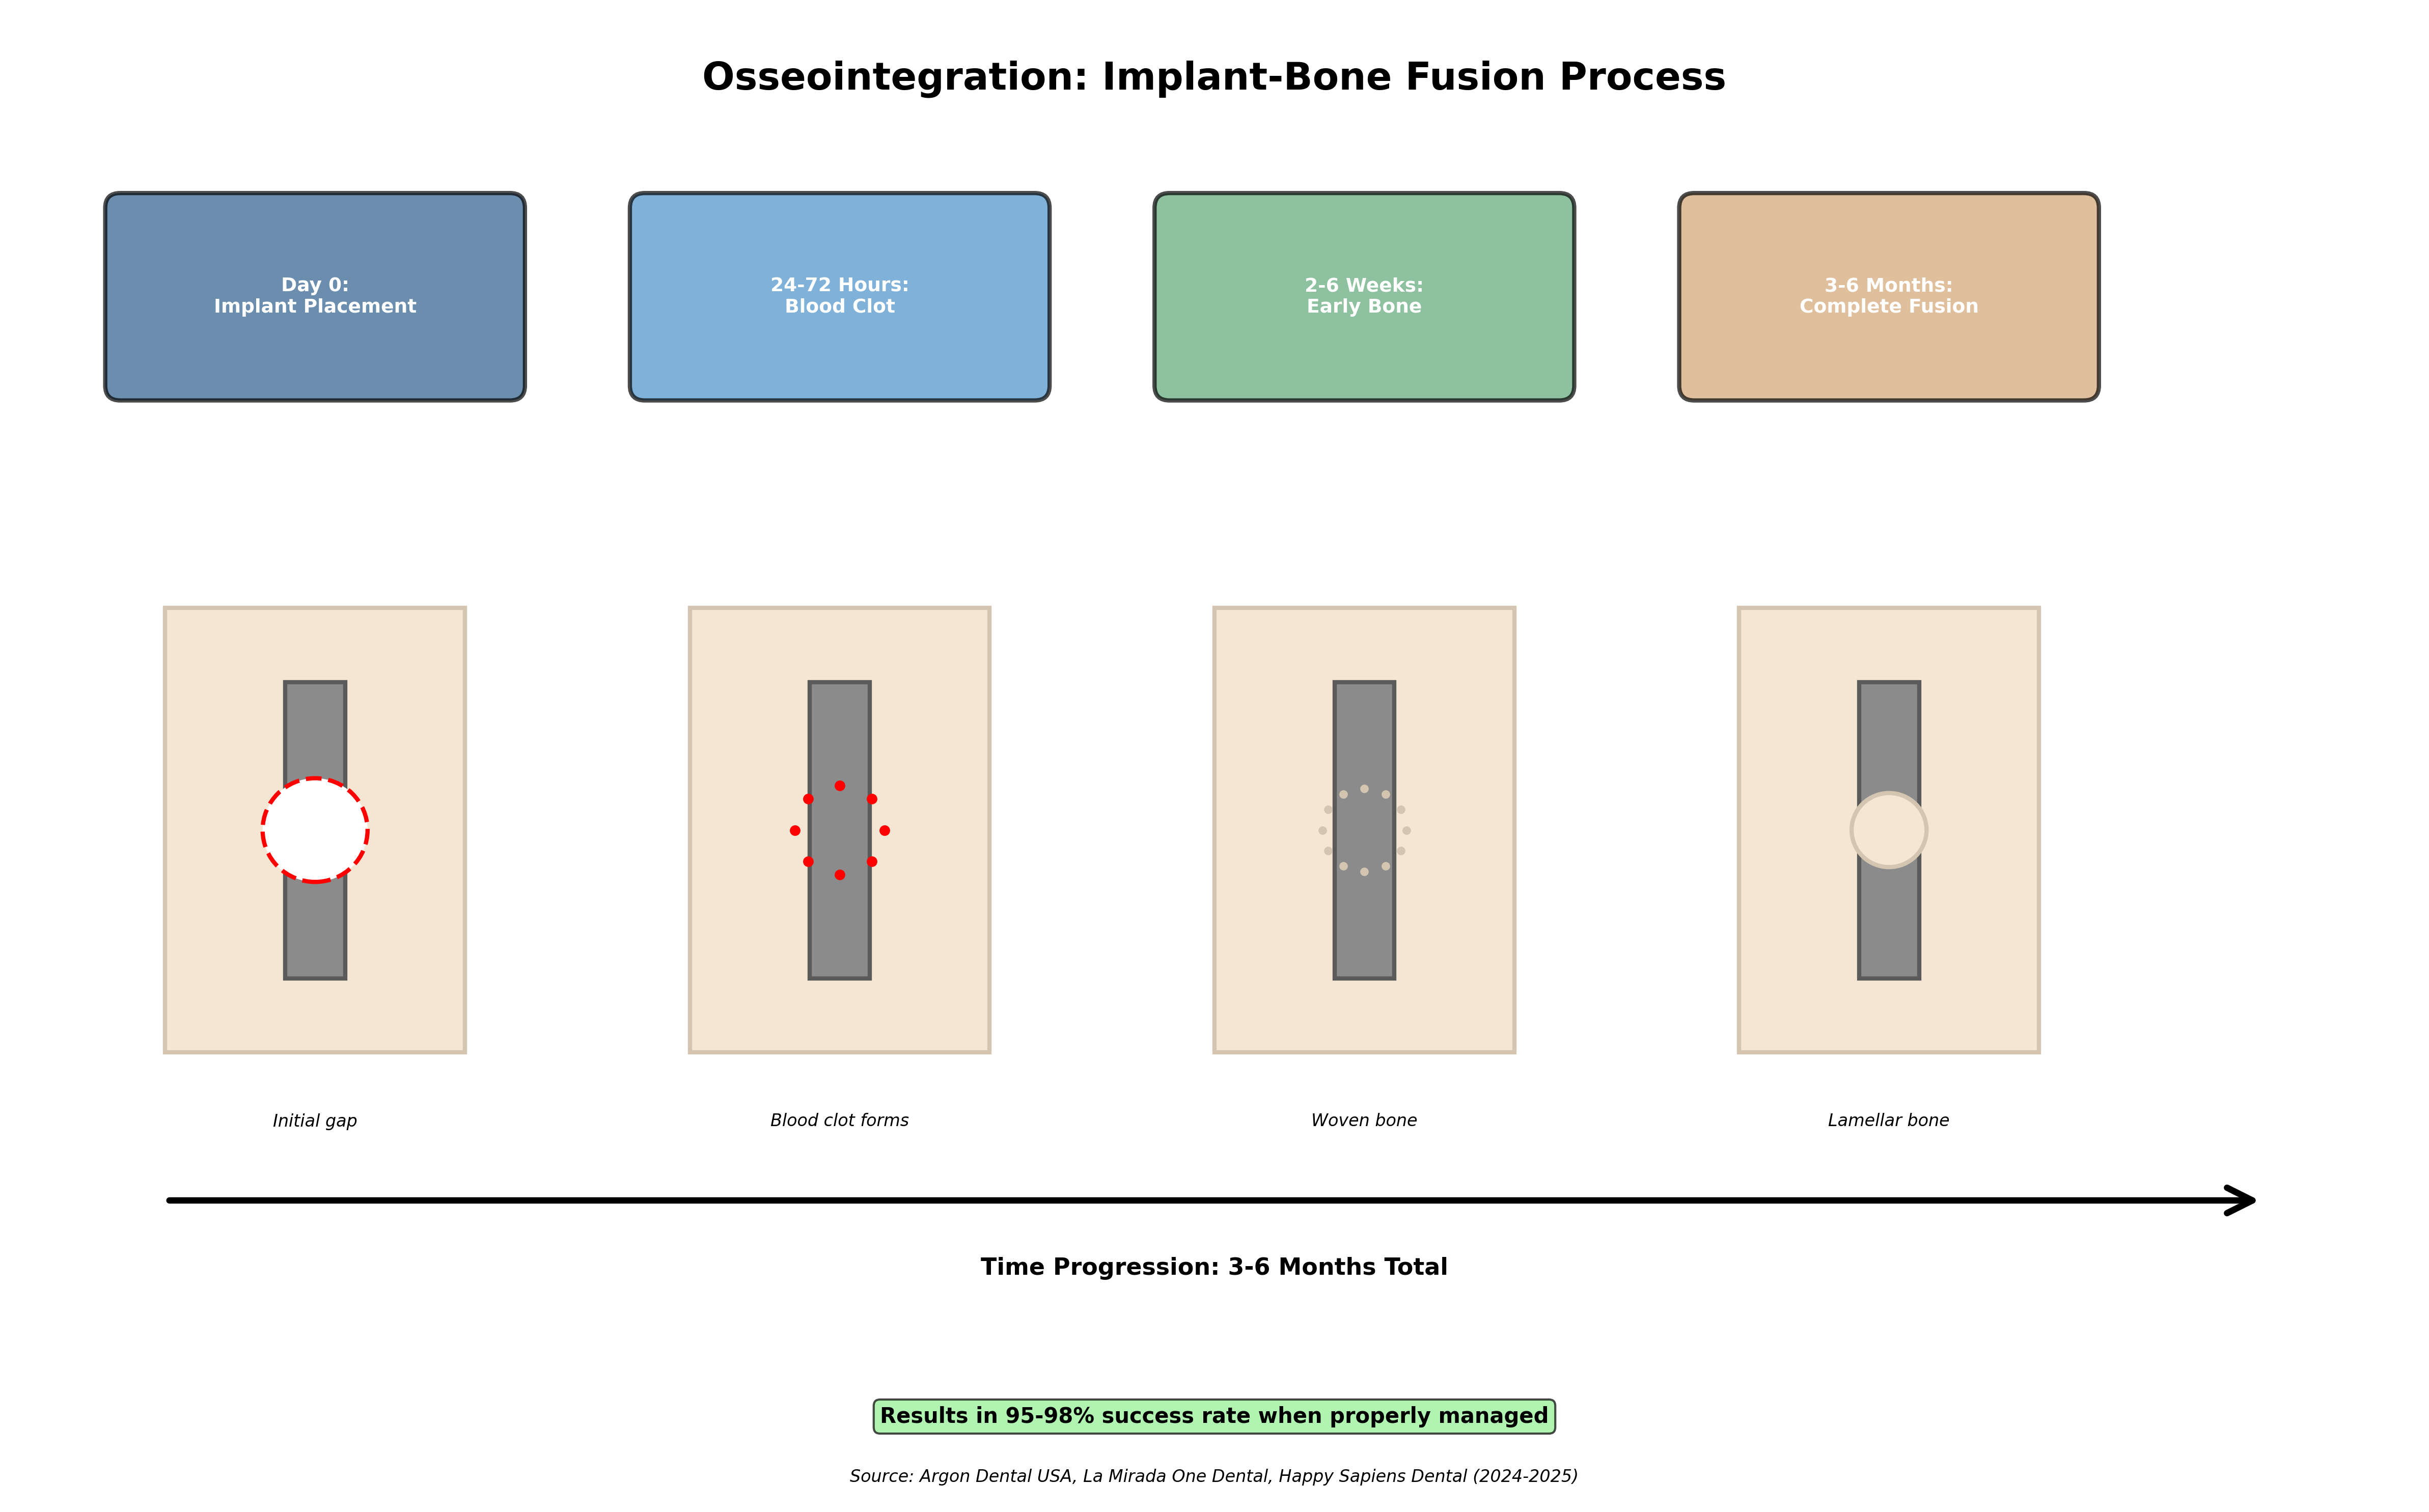
What Is Osseointegration?Osseointegration is the direct structural and functional connection between living bone and the surface of the load-bearing artificial implant. This biological process is the foundation of implant success—it's what transforms a titanium post into a functional tooth root.
During osseointegration, bone cells grow onto and into the implant surface, creating a bond that's actually stronger than the bond between natural teeth and bone. This process is remarkable and represents one of the most significant advances in modern medicine.
Why It Matters:Osseointegration is what allows your implants to:
- Support the forces of chewing (up to 200+ pounds of pressure)
- Remain stable for decades
- Preserve jawbone structure
- Function like natural tooth roots
- Provide a permanent foundation for your prosthesis
Total Healing Duration: 4-6 Months
The complete healing and osseointegration process typically spans 4-6 months. While this may seem like a long time, this period is essential for long-term success. The good news is that if you received immediate loading, you'll have temporary teeth throughout this period.
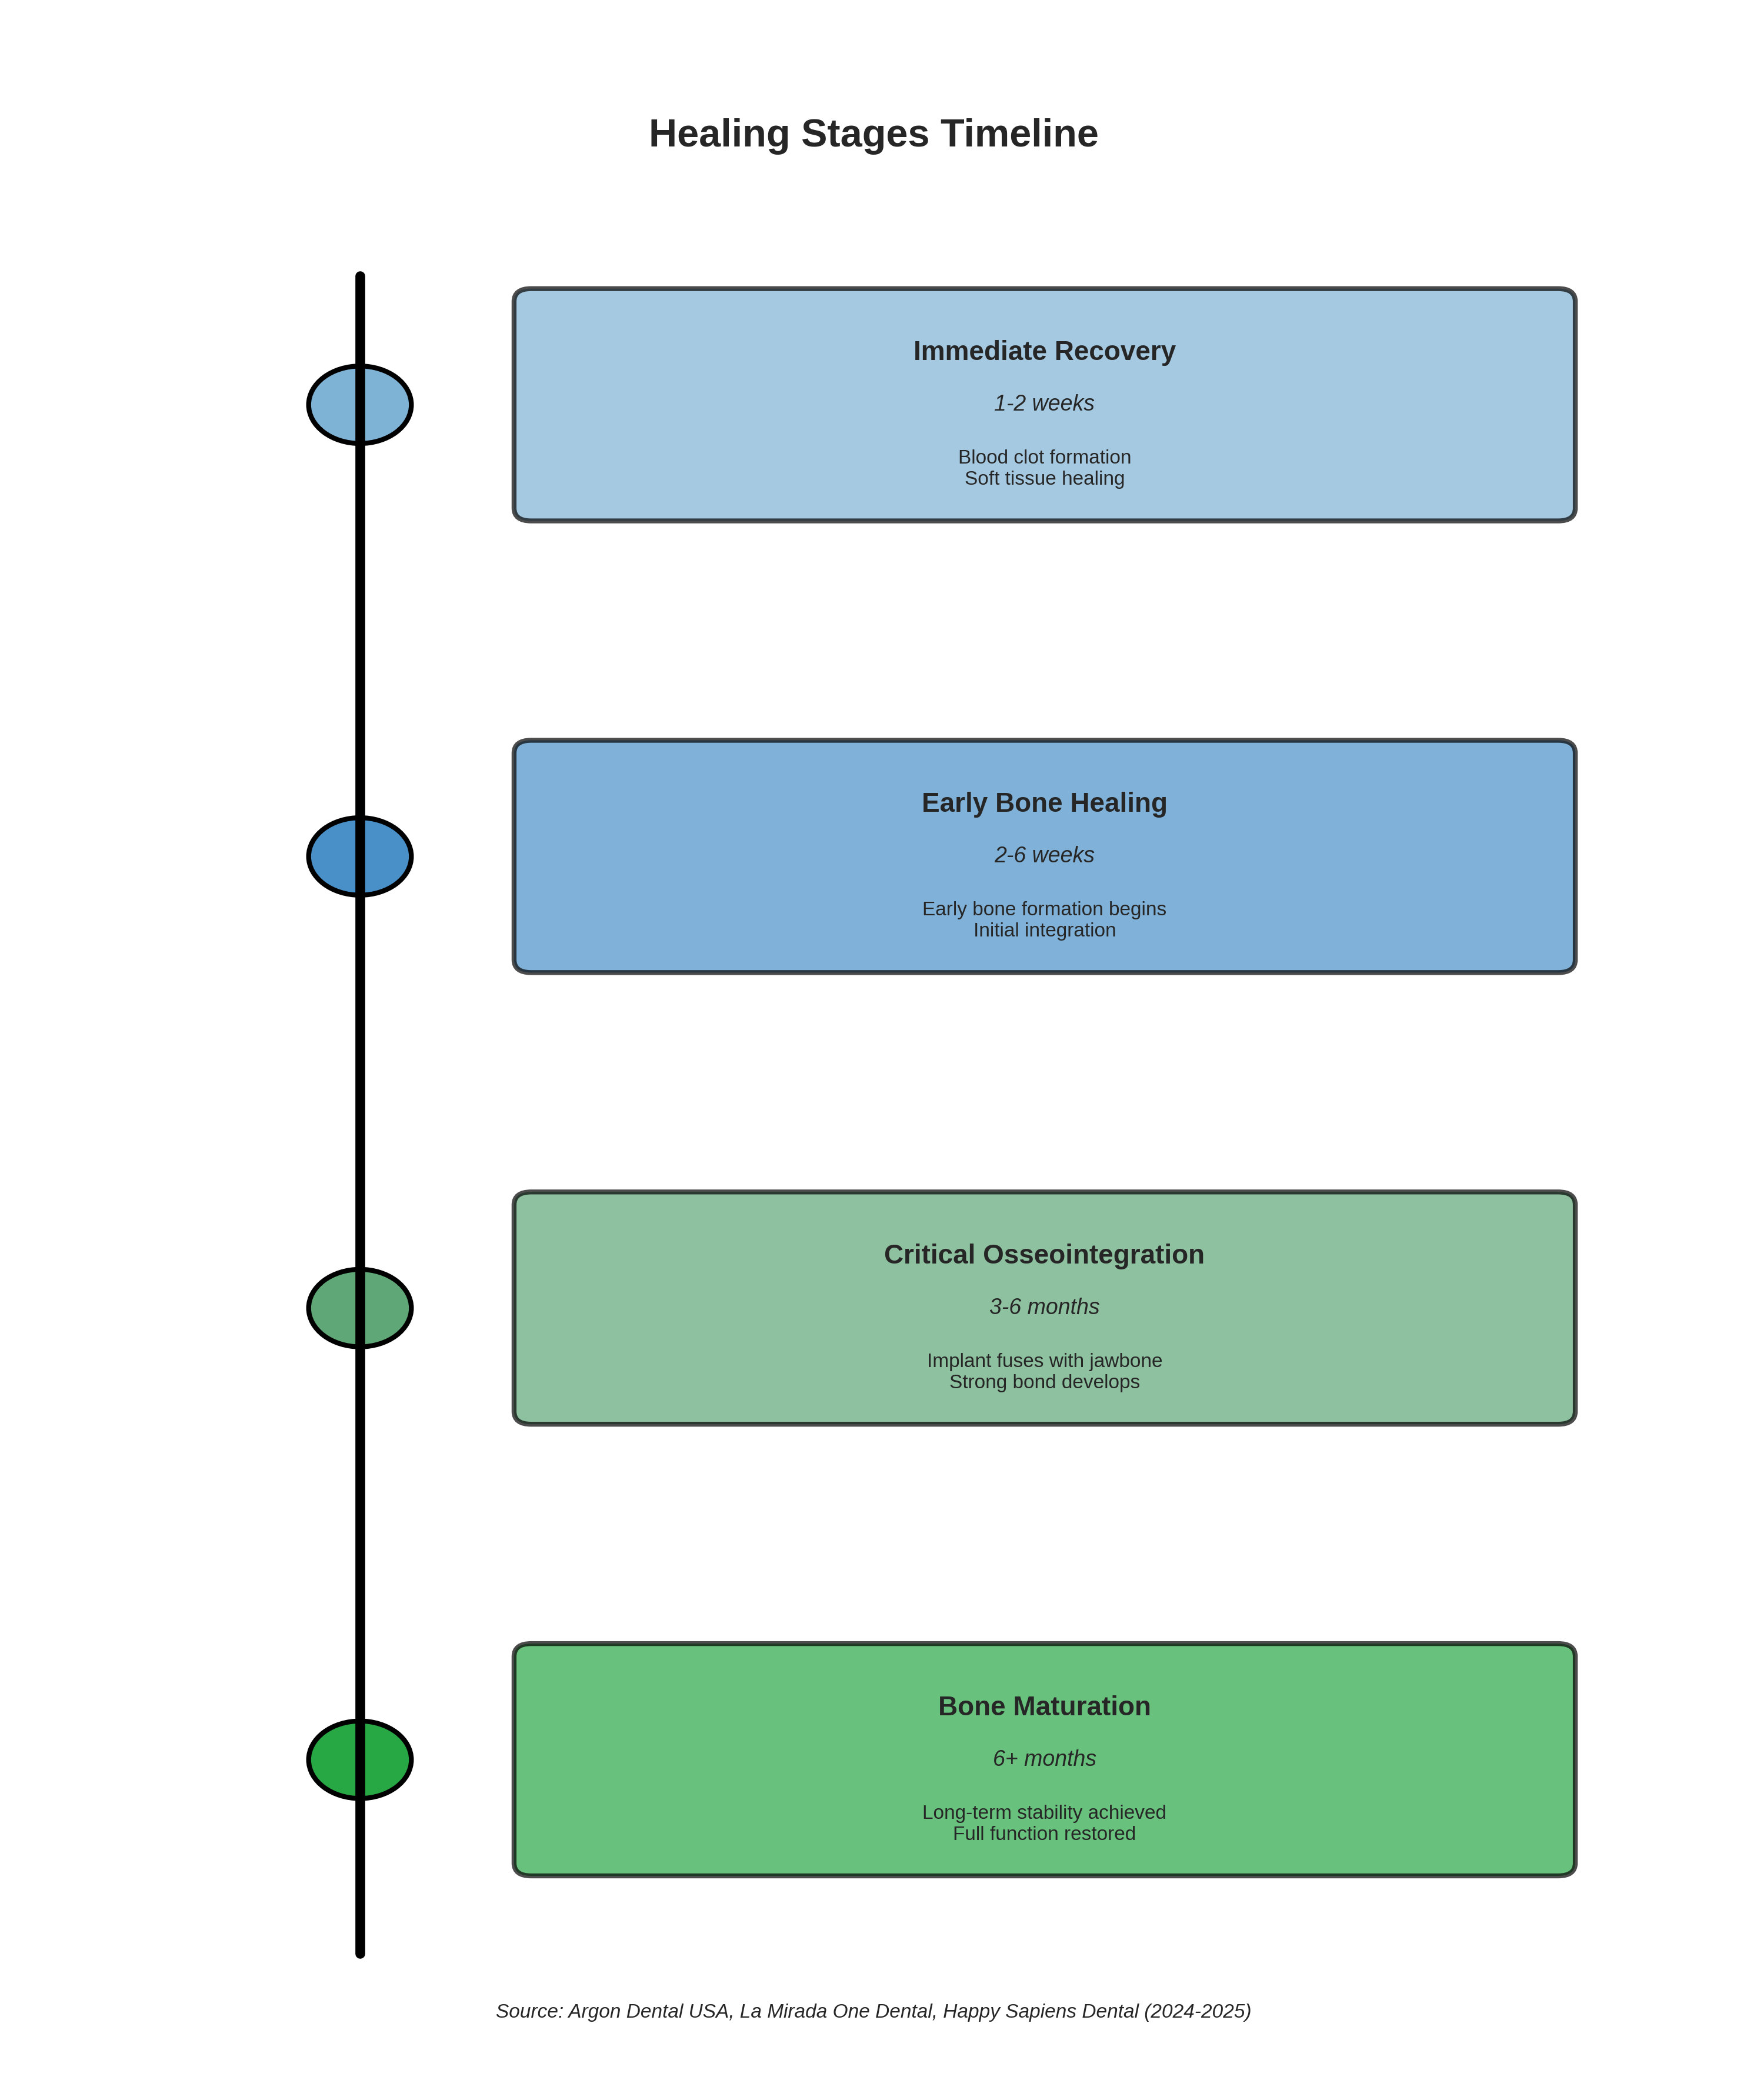
Healing Stages in Detail
Stage 1: Immediate Recovery (First 1-2 Weeks)- Blood Clot Formation: Initial 24-72 hours, blood clots form at surgery sites
- Soft Tissue Healing: Gums begin healing around implants
- Initial Inflammatory Response: Normal healing response
- Most Acute Discomfort: This period involves the most noticeable discomfort
- Suture Removal: Typically at 7-14 days
- Swelling and discomfort (managed with medication)
- Dietary restrictions (soft foods only)
- Activity limitations
- Frequent follow-up communication with your surgeon
- Soft Tissue Continues Healing: Gums mature around implants
- Early Bone Formation: Woven bone starts forming around implant surface
- Implant Stability: Maintained through mechanical retention
- Gradual Comfort Improvement: Discomfort resolves, swelling subsides
- Return to most normal activities
- Gradual diet expansion (still avoiding hard foods)
- Reduced awareness of implants
- Increasing comfort and confidence
This is the most crucial period for successful integration:
- Implant-Bone Fusion: Implant fuses with jawbone at cellular level
- Woven Bone Replacement: Initial woven bone replaced by stronger lamellar bone
- Bone Remodeling: Bone structure optimizes around implant
- Biological Stability: Implant achieves biological stability (beyond just mechanical)
- Foundation Establishment: Permanent foundation for prosthesis created
- Normal daily activities resumed
- Minimal awareness of implants
- If you have temporary teeth, they function well during this period
- Anticipation of final prosthesis
- Continued Remodeling: Bone continues to mature and strengthen
- Mature Bone Structure: Stable, mature bone established
- Long-Term Stability: Foundation for decades of function
- Full Loading Capability: Prosthesis can be loaded with full chewing forces
- Preparation for final prosthesis
- Excitement about completing treatment
- Confidence in your new smile
Patient Compliance During Healing
Your role during the healing phase significantly impacts success:
Do's:- Maintain excellent oral hygiene (gentle around implants)
- Attend all follow-up appointments
- Follow dietary guidelines
- Take medications as prescribed
- Report any concerns promptly
- Avoid smoking and excessive alcohol
- Get adequate rest and nutrition
- Don't smoke (significantly impairs healing)
- Don't skip follow-up appointments
- Don't ignore warning signs (severe pain, excessive swelling, fever)
- Don't eat hard foods prematurely
- Don't neglect oral hygiene
- Don't engage in contact sports without protection
3.6 Final Restoration Phase: Your New Smile
Prosthesis Fabrication
Once osseointegration is complete (typically 4-6 months after implant placement), the process of creating your final prosthesis begins:
Final Impressions or Digital Scans:Precise records of your implant positions and jaw relationships:
- Digital Scanning: Modern practices use intraoral scanners for precise digital impressions
- Traditional Impressions: Some cases use traditional impression materials
- Accuracy: Critical for proper fit and function
- Comfort: Much more comfortable than traditional denture impressions
Choosing the color of your new teeth:
- Natural Appearance: Matching your desired tooth color
- Facial Harmony: Considering skin tone and facial features
- Age-Appropriate: Natural-looking shade for your age
- Personal Preference: Your input is essential
Before finalizing your prosthesis, you'll have try-in appointments:
- Fit Verification: Ensuring proper fit and comfort
- Aesthetic Approval: Checking appearance, tooth size, shape, and color
- Bite Refinement: Adjusting how teeth come together
- Speech Check: Ensuring proper phonetics
- Your Input: Opportunity for any desired changes
Based on try-in appointments:
- Modifications: Any necessary changes to fit, appearance, or function
- Refinements: Fine-tuning details
- Patient Satisfaction: Ensuring you're completely happy with the result
Final Delivery: Your Transformation Complete
Prosthesis Placement:The exciting moment when your final prosthesis is placed:
- Attachment: Prosthesis secured to implants
- Verification: Ensuring proper seating and stability
- Initial Impressions: Your first look at your completed smile
Fine-tuning how your teeth come together:
- Bite Balance: Ensuring even contact across all teeth
- Comfort: Eliminating any high spots or discomfort
- Function: Optimizing chewing efficiency
- TMJ Consideration: Protecting jaw joints
Comprehensive training on caring for your new teeth:
- Cleaning Techniques: How to brush and floss around implants
- Specialized Tools: Water flossers, interdental brushes, implant-specific floss
- Daily Routine: Establishing effective habits
- Problem Prevention: Avoiding peri-implantitis and complications
Setting up your long-term care plan:
- First Year: Appointments every 3-4 months
- Ongoing: Appointments every 6 months after first year
- Radiographic Monitoring: Periodic X-rays to assess bone levels
- Professional Cleaning: Specialized implant maintenance
Understanding your role in long-term success:
- Daily Responsibilities: Home care requirements
- Warning Signs: What to watch for
- Dietary Guidance: Foods to enjoy and any to avoid
- Long-Term Expectations: What to expect over years and decades
Timeline: Final Impressions to Delivery
The fabrication of your final prosthesis typically takes 2-4 weeks:
- Week 1: Impressions/scans taken, sent to laboratory
- Week 2-3: Laboratory fabrication
- Week 3-4: Try-in appointment(s) and any modifications
- Week 4: Final delivery
This timeline may vary based on complexity and any modifications needed.
3.7 Recovery and Return to Normal Activities
Return to Work
Most patients can return to work relatively quickly:
Desk Job:- Timeline: Typically 2-3 days after surgery
- Considerations: Minimal physical demands allow earlier return
- Comfort: May experience some swelling and discomfort
- Medications: Can usually manage with over-the-counter pain relief by this point
- Timeline: 1-2 weeks typically recommended
- Considerations: Physical exertion can increase swelling and discomfort
- Healing Protection: Avoiding strain supports optimal healing
- Individual Variation: Some patients need more time based on job demands
Return to Activities
Light Exercise:- Timeline: 1 week after surgery
- Activities: Walking, light stretching, gentle yoga
- Benefits: Promotes circulation and healing
- Precautions: Avoid anything that significantly elevates heart rate
- Timeline: 2-3 weeks with surgeon approval
- Activities: Running, weightlifting, aerobics, sports
- Gradual Progression: Start slowly and increase intensity gradually
- Listen to Your Body: Stop if you experience pain or excessive swelling
- Timeline: 4-6 weeks minimum
- Protection: Consider mouthguard for implant protection
- Surgeon Approval: Get clearance before returning to contact sports
Return to Normal Diet
Dietary progression is gradual to protect healing implants:
Week 1-2:- Protein shakes and smoothies
- Soups and broths
- Yogurt and pudding
- Mashed potatoes
- Soft scrambled eggs
- Soft pasta
- Ground meat
- Soft vegetables
- Soft fruits (bananas, berries)
- Soft bread
- Gradual introduction of firmer foods
- Most normal foods as comfort allows
- Still avoiding very hard or crunchy foods
- Gradual return to all foods
- Full diet typically by 3-4 months
- After final prosthesis: no dietary restrictions
Key Takeaways
As we conclude Module 3, let's review the essential concepts:
- Complete treatment typically takes 4-6 months from implant placement to final restoration, though preparatory procedures may extend this timeline.
- The initial consultation is comprehensive, lasting 1-2 hours and including examination, medical history review, CBCT imaging, and treatment planning.
- Candidacy depends on multiple factors including overall health, bone quality, lifestyle factors, and commitment to maintenance. Most patients are candidates with proper evaluation.
- Preparatory procedures (extractions, bone grafting, sinus lifts) may be needed and require 3-6 months healing before implant placement.
- Surgery day involves 2-4 hours of procedure time under IV sedation or general anesthesia, with immediate loading possible in appropriate cases.
- Osseointegration is the critical healing phase where implants fuse with bone over 3-6 months, creating the permanent foundation for your prosthesis.
- Recovery is manageable with most patients returning to work within 2-3 days (desk jobs) or 1-2 weeks (physical labor).
- Patient compliance throughout the journey significantly impacts success, including following dietary guidelines, maintaining oral hygiene, and attending all appointments.
- The final restoration phase involves 2-4 weeks of prosthesis fabrication with try-in appointments to ensure perfect fit and aesthetics.
- Long-term success requires ongoing maintenance with professional cleanings every 3-4 months the first year and every 6 months thereafter.
Reflection Questions
To deepen your understanding of this module's content, consider these questions:
- How does understanding the complete timeline help you prepare mentally and practically for treatment?
- What aspects of the candidacy assessment are within your control to optimize before treatment?
- Why is osseointegration considered the most critical phase of implant treatment?
- How can you best prepare your home and schedule to support optimal recovery?
- What role does patient compliance play in each phase of treatment?
Looking Ahead
In Module 4, we'll explore the financial aspects of full-arch dental implants, including detailed cost breakdowns, insurance coverage strategies, financing options, and long-term return on investment analysis. Understanding the financial investment helps you plan appropriately and make informed decisions about this life-changing treatment.
Visual Content Placeholders
[INFOGRAPHIC: Complete Patient Journey Timeline - Visual timeline from consultation through final restoration with key milestones]
[FLOWCHART: Initial Consultation Process - Step-by-step visualization of consultation components]
[DIAGRAM: Osseointegration Stages - Illustrated progression of bone integration over 4-6 months]
[CALENDAR: Recovery Timeline - Day-by-day and week-by-week recovery expectations]
[PHOTO SERIES: Before/During/After - Patient transformation through treatment phases]
[CHART: Return to Activities Timeline - Visual guide for resuming work, exercise, and normal diet]
[DIAGRAM: Healing Stages - Detailed illustration of the four healing stages with timeframes]
[CHECKLIST: Pre-Surgery Preparation - Comprehensive checklist for surgery day preparation]
Module 3 Complete Continue to Module 4: Financial Planning and Investment in Your Smile