Module 2: All-on-4 and All-on-6 Techniques Explained
Introduction
Welcome to Module 2, where we explore the two primary techniques that have revolutionized full-arch dental implant rehabilitation: All-on-4 and All-on-6. These innovative approaches have made comprehensive tooth replacement more accessible, predictable, and successful than ever before.
Building on the foundational knowledge from Module 1, this module delves into the specific clinical details of each technique. Whether you're a patient trying to understand which approach might be right for you, a referring dentist seeking to better counsel patients, or a healthcare professional expanding your knowledge, this module provides the detailed information you need.
At St. Louis South Oral & Maxillofacial Surgery, we believe that understanding the "how" of treatment empowers better decision-making. Our commitment to education reflects our dual identity as both clinical experts (The Sage) and compassionate caregivers (The Healer).
Learning Objectives
By the end of this module, you will be able to:
- Understand the All-on-4 technique, including implant placement strategy and clinical advantages
- Learn about the All-on-6 approach and when it's clinically preferred
- Compare success rates and outcomes between both techniques based on current evidence
- Recognize the factors that determine technique selection for individual patients
- Understand immediate loading protocols and same-day teeth options
- Appreciate the role of prosthetic materials in treatment outcomes
2.1 The All-on-4 Technique
Procedure Overview and Implant Placement Strategy
The All-on-4 technique represents one of the most significant innovations in implant dentistry. Developed to provide a full arch of teeth using just four strategically placed implants, this approach has transformed the accessibility and predictability of full-arch rehabilitation.
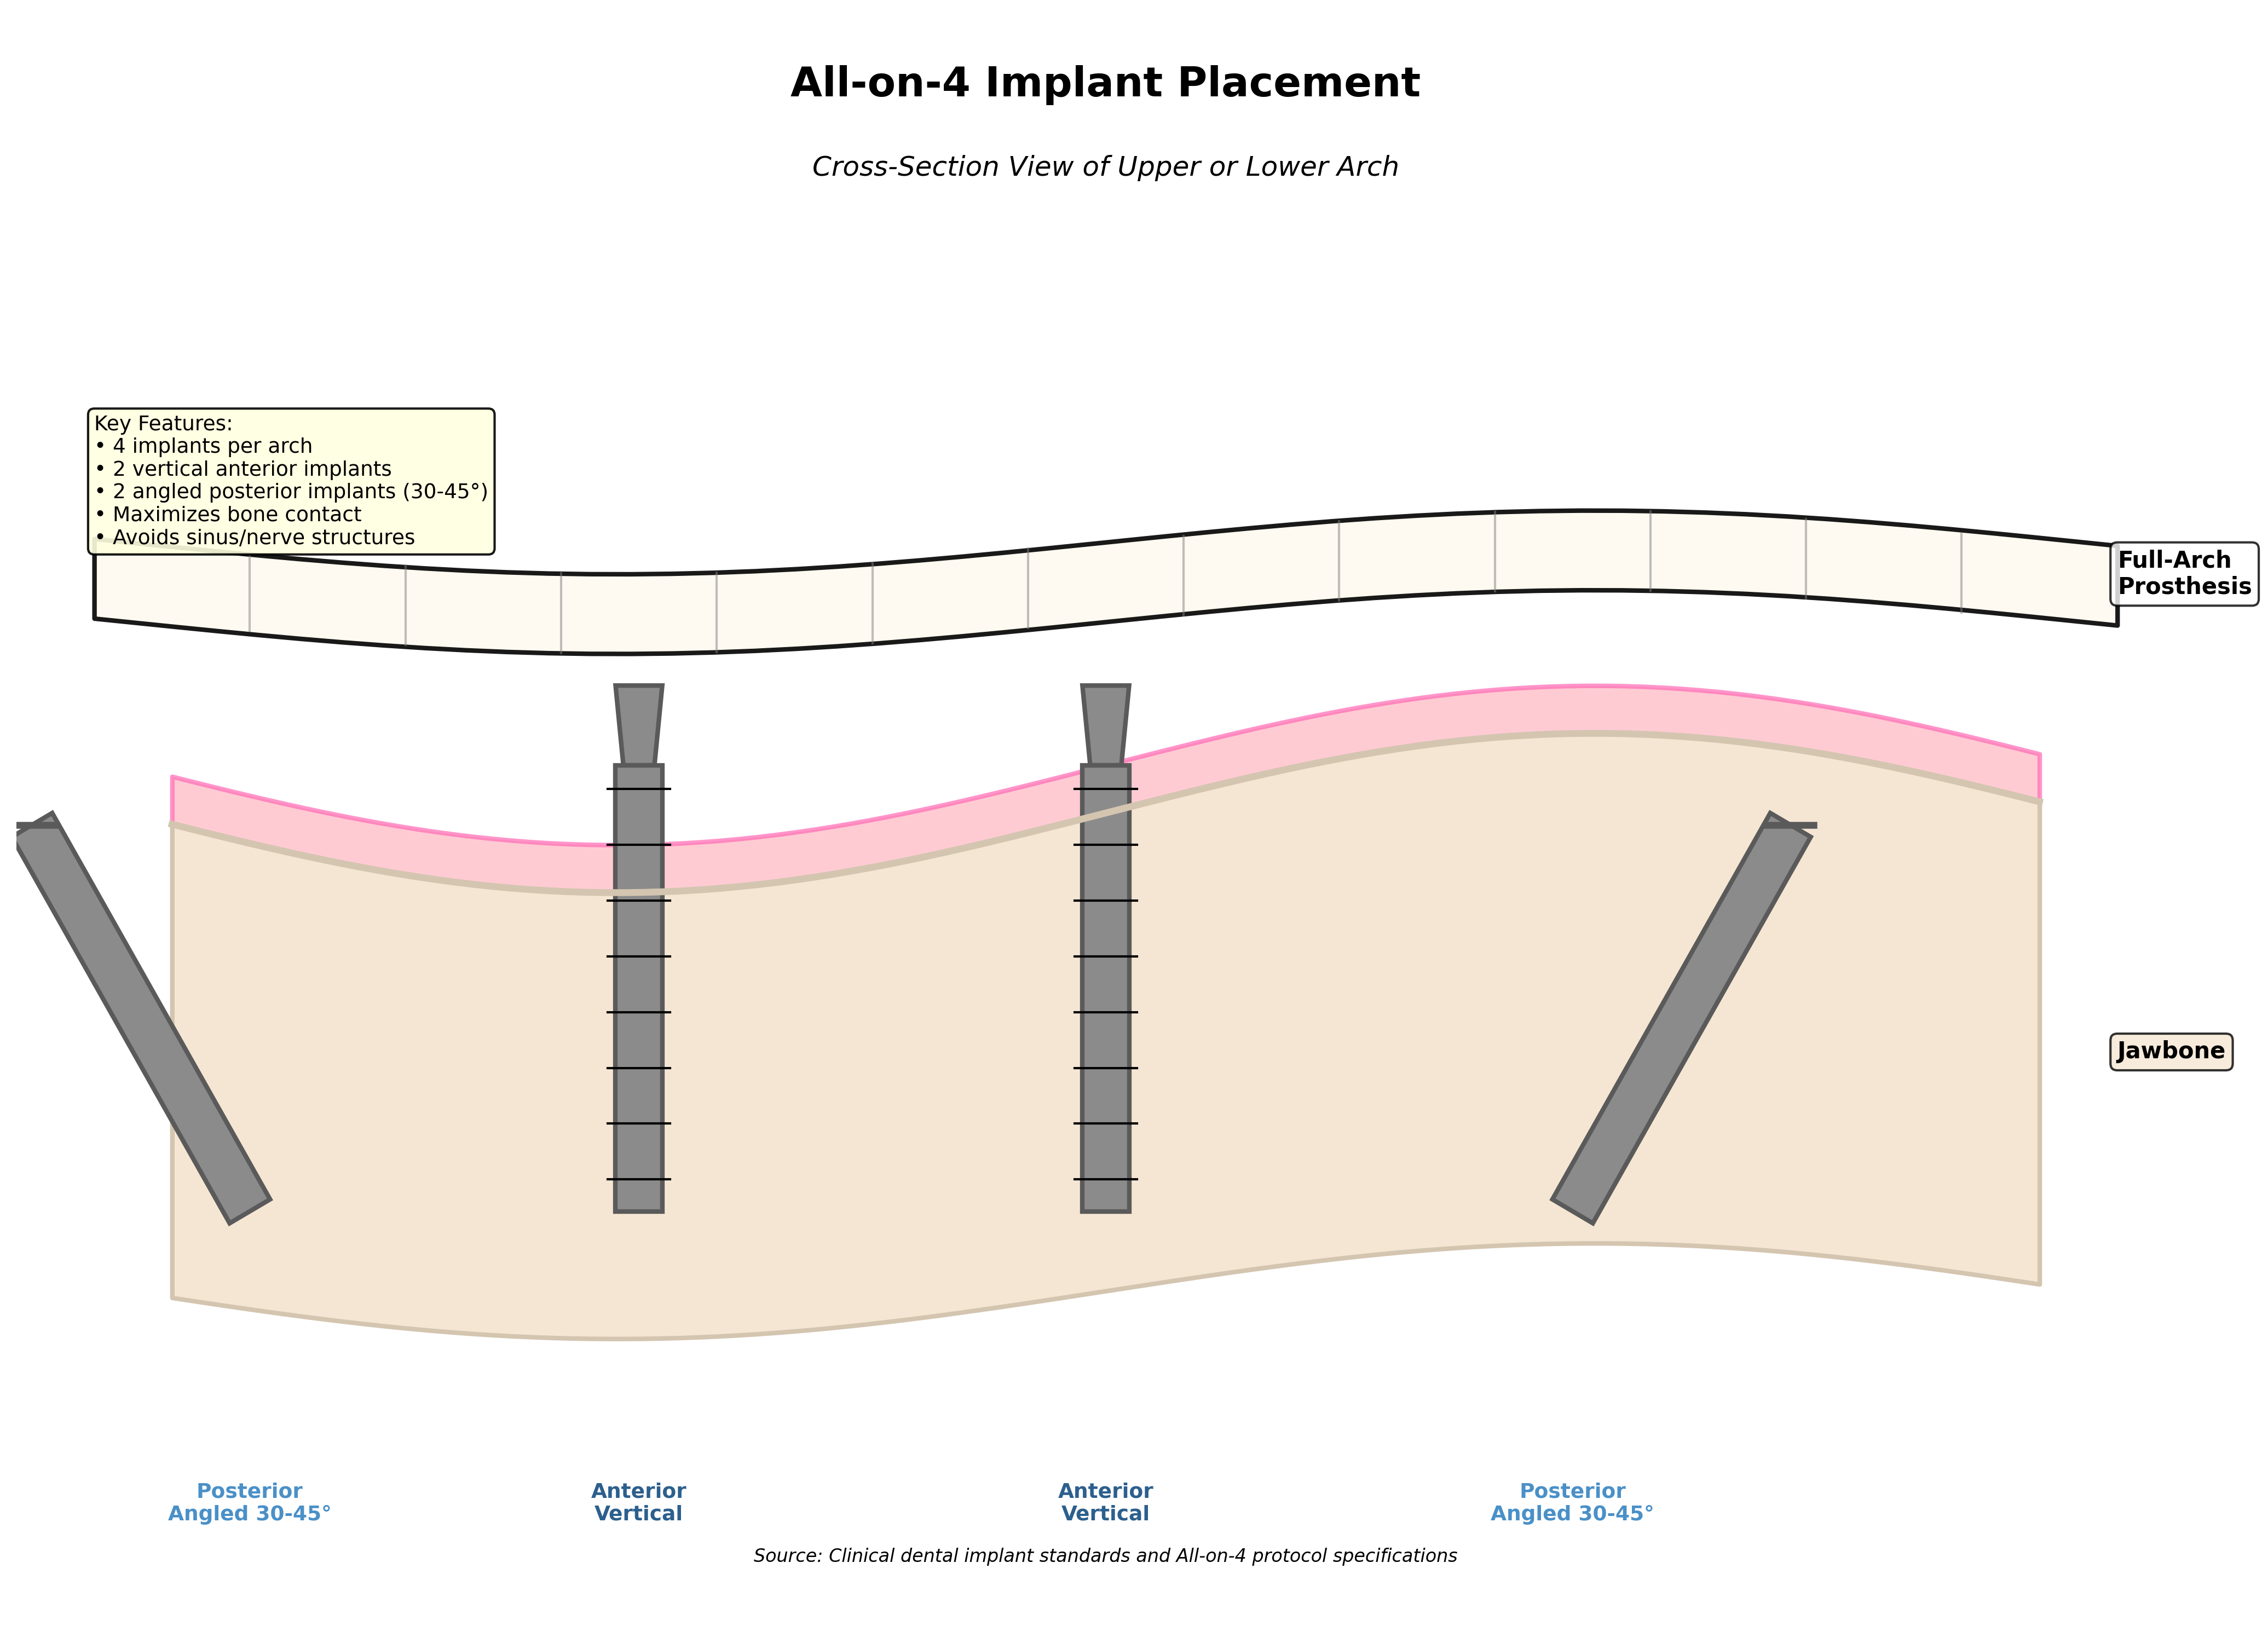
The Strategic Placement:The genius of All-on-4 lies in its strategic implant placement:
- Two anterior (front) implants are placed vertically in the front portion of the jaw, where bone is typically denser and more abundant
- Two posterior (back) implants are placed at an angle, typically 30-45 degrees, in the back portion of the jaw
This angled placement of the posterior implants serves multiple critical purposes:
- Maximizes bone contact: The angled implants engage more bone along their length, increasing stability
- Avoids anatomical structures: The angle allows implants to bypass the maxillary sinuses in the upper jaw and the inferior alveolar nerve in the lower jaw
- Optimizes load distribution: The angled configuration creates a wider support base, similar to the legs of a table, distributing chewing forces more effectively
- Eliminates grafting needs: By utilizing available bone more efficiently, All-on-4 often eliminates the need for bone grafting procedures
Once the four implants are placed, they support a custom-designed prosthesis that replaces all teeth in the arch. The prosthesis is engineered to distribute chewing forces evenly across all four implants, ensuring long-term stability and success.
Clinical Advantages
The All-on-4 technique offers numerous advantages that have made it the most popular approach for full-arch rehabilitation:
Fewer Implants Required:Using only four implants reduces surgical complexity, treatment time, and initial cost compared to approaches requiring more implants. This efficiency doesn't compromise outcomes—the strategic placement provides excellent stability and function.
Potential for Immediate Loading:In appropriate cases, All-on-4 allows for immediate loading, meaning patients can receive a temporary prosthesis on the same day as implant placement. This "teeth in a day" approach eliminates the period of being without teeth and allows patients to return to normal activities more quickly.
Avoidance of Anatomical Structures:The angled posterior implants skillfully navigate around critical anatomical structures:
- In the upper jaw: maxillary sinuses
- In the lower jaw: inferior alveolar nerve
This strategic avoidance reduces the risk of complications and often eliminates the need for additional procedures like sinus lifts.
Reduced Need for Bone Grafting:By maximizing the use of available bone through strategic angulation, All-on-4 often eliminates the need for bone grafting. This means:
- Shorter overall treatment timeline
- Reduced cost
- Fewer surgical procedures
- Faster path to final restoration
All-on-4 provides a cost-effective solution for full-arch replacement. As of 2025, the typical cost for a single full arch ranges from $18,000 to $38,000, varying based on prosthesis material selection and any additional procedures required.
Success Rates and Clinical Evidence
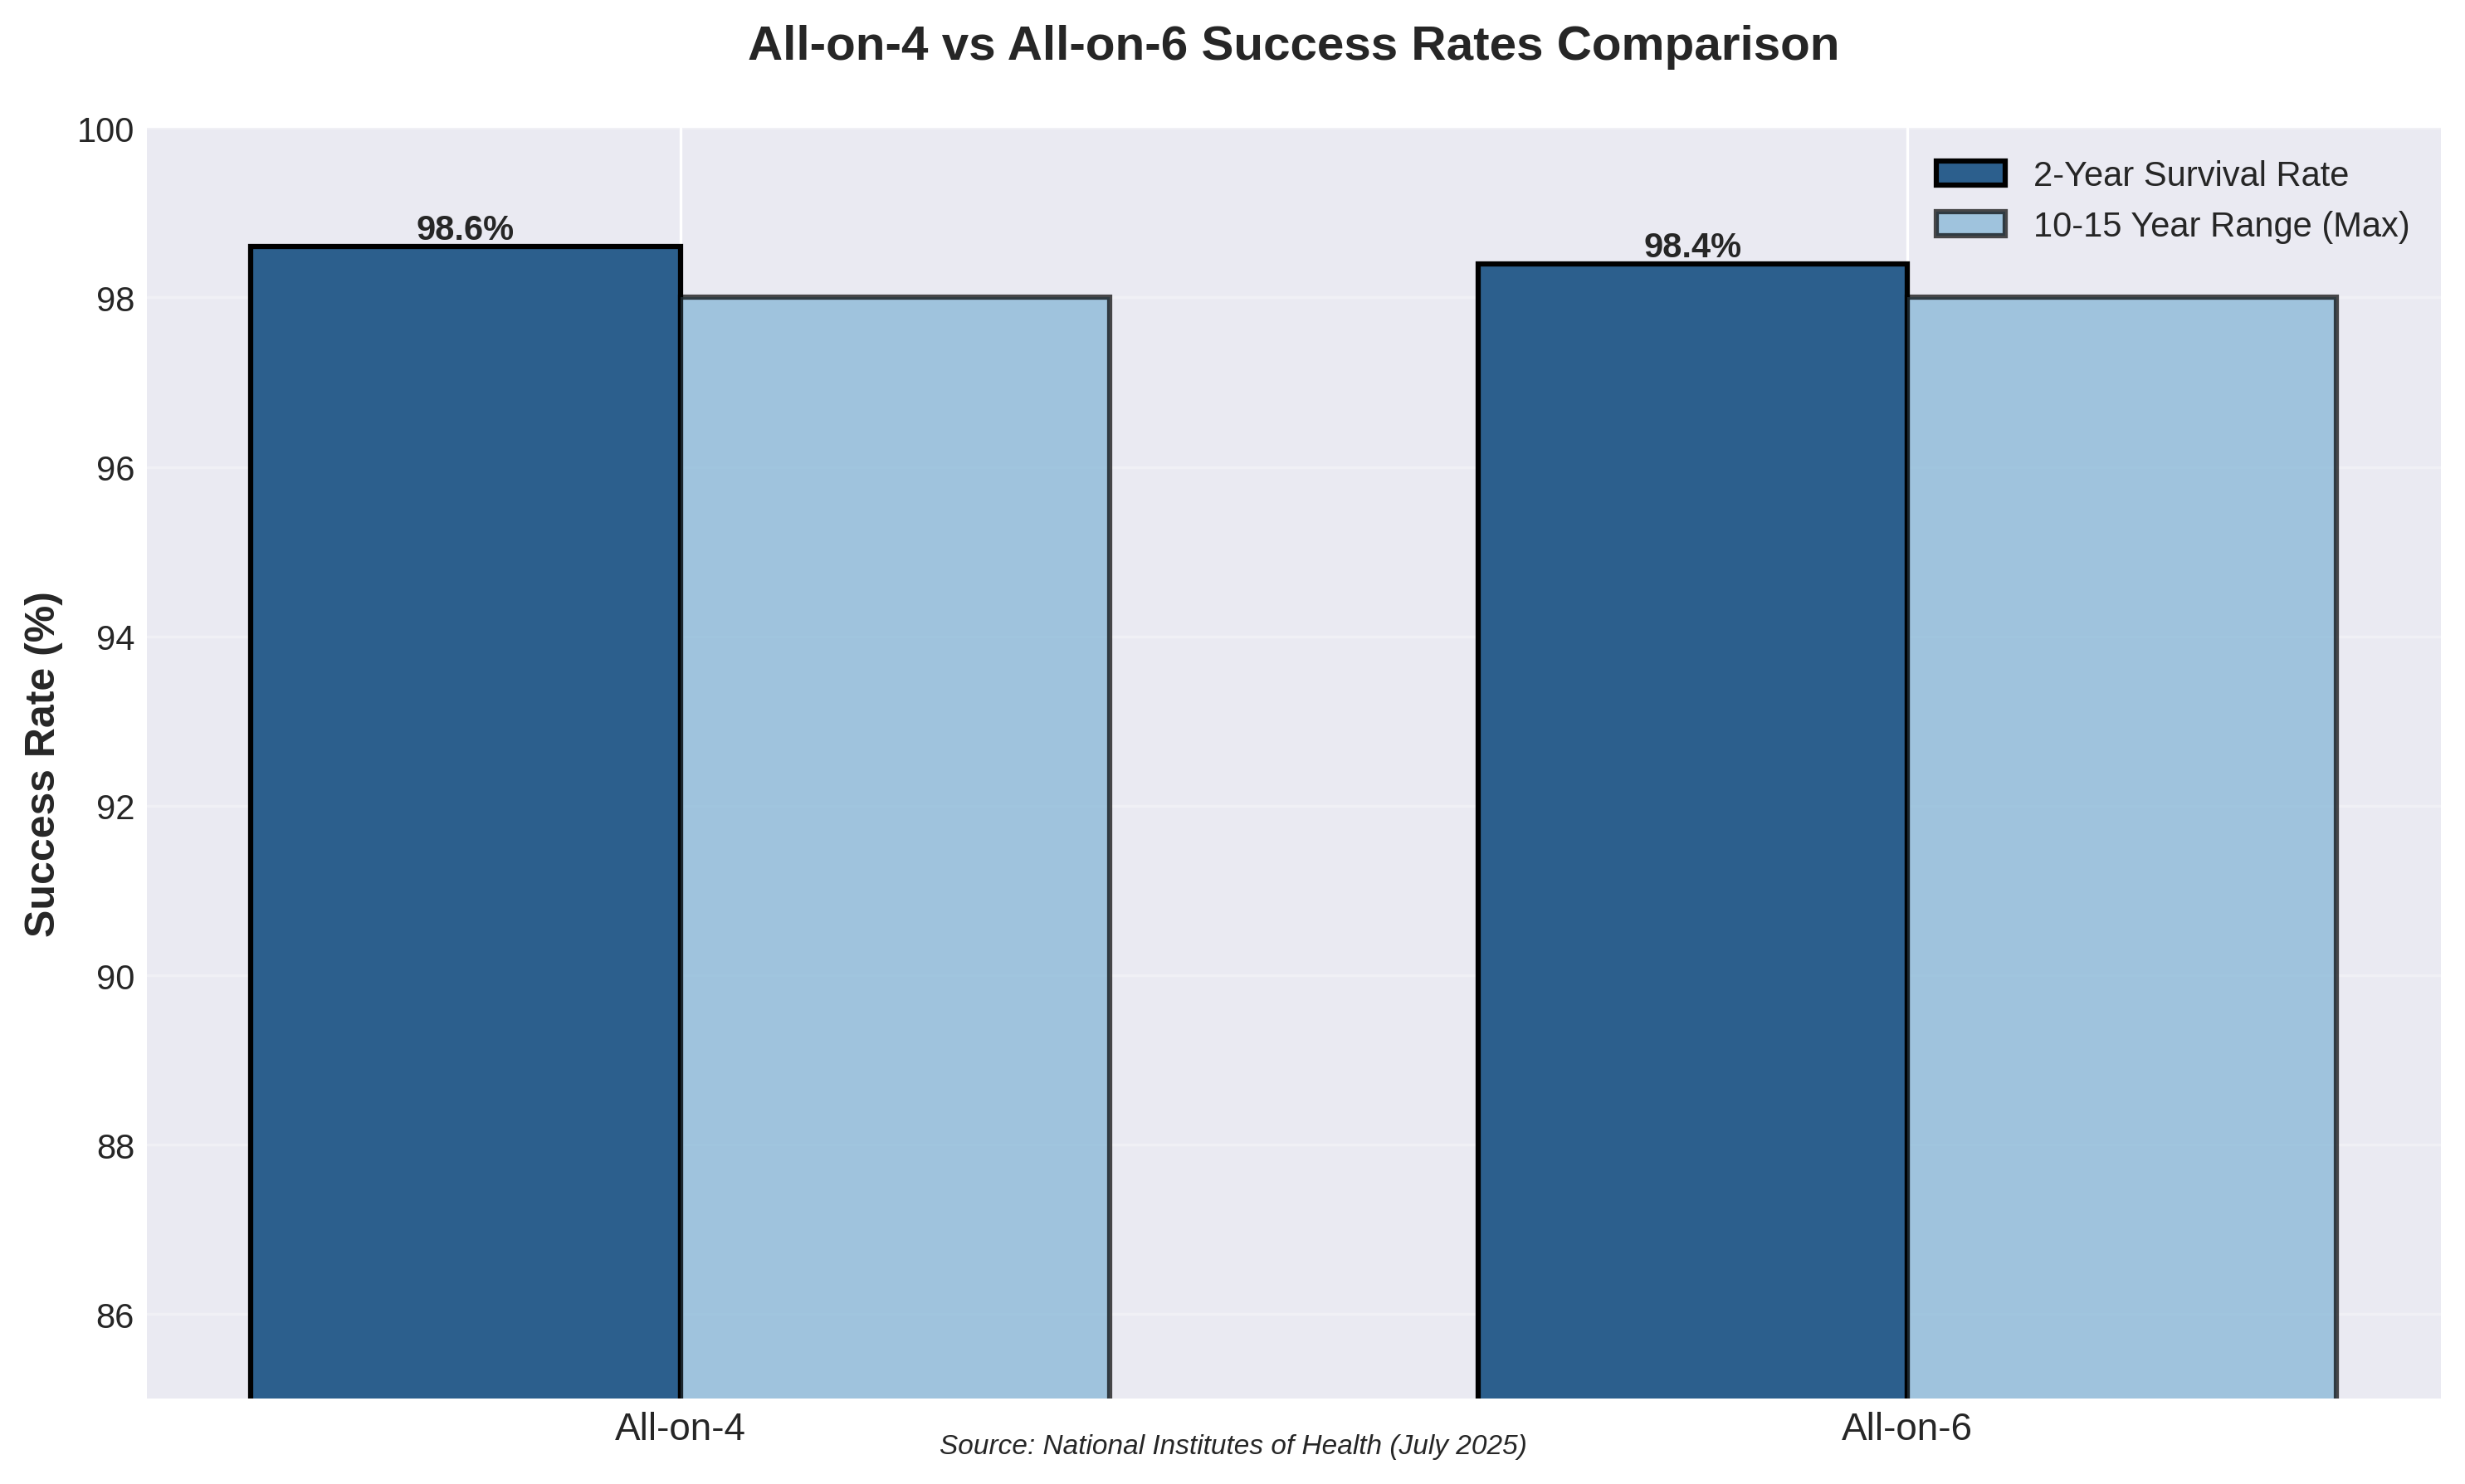
The All-on-4 technique is supported by extensive clinical research demonstrating excellent outcomes:
Short-Term Success:- 2-year cumulative survival rate: 98.6%
This remarkably high survival rate at two years indicates that the vast majority of All-on-4 treatments integrate successfully and function as intended.
Medium-Term Success:- 5-year cumulative survival rate: Statistically comparable to All-on-6 (no significant difference)
The five-year data is particularly important because it demonstrates sustained success beyond the initial healing period. The fact that All-on-4 performs comparably to All-on-6 (which uses more implants) validates the effectiveness of the four-implant design.
Long-Term Success:- 10-15 year survival rates: 90-98%
Long-term data shows that All-on-4 implants can last for decades with proper care. While the prosthetic teeth may need replacement after 10-15 years due to normal wear, the implants themselves typically remain stable and functional.
Clinical Interpretation:These success rates, derived from National Institutes of Health studies published in July 2025, place All-on-4 among the most predictable and successful procedures in dentistry. The technique's track record over more than two decades of use provides confidence in its reliability.
Ideal Candidates for All-on-4
While All-on-4 is suitable for many patients, certain characteristics make someone an ideal candidate:
Adequate Bone Density:Patients with reasonable bone density in the anterior (front) region of the jaw are excellent candidates. The technique is specifically designed to work with the bone that's typically most preserved.
Desire for Efficiency:Patients who value a streamlined treatment process with fewer implants and potentially shorter timeline often prefer All-on-4.
Budget Considerations:For patients seeking the most cost-effective full-arch solution without compromising quality, All-on-4 offers excellent value.
Anatomical Considerations:Patients with sinus proximity in the upper jaw or nerve proximity in the lower jaw may be ideal candidates, as the angled implant placement navigates around these structures.
2.2 The All-on-6 Technique
Procedure Overview and Enhanced Support
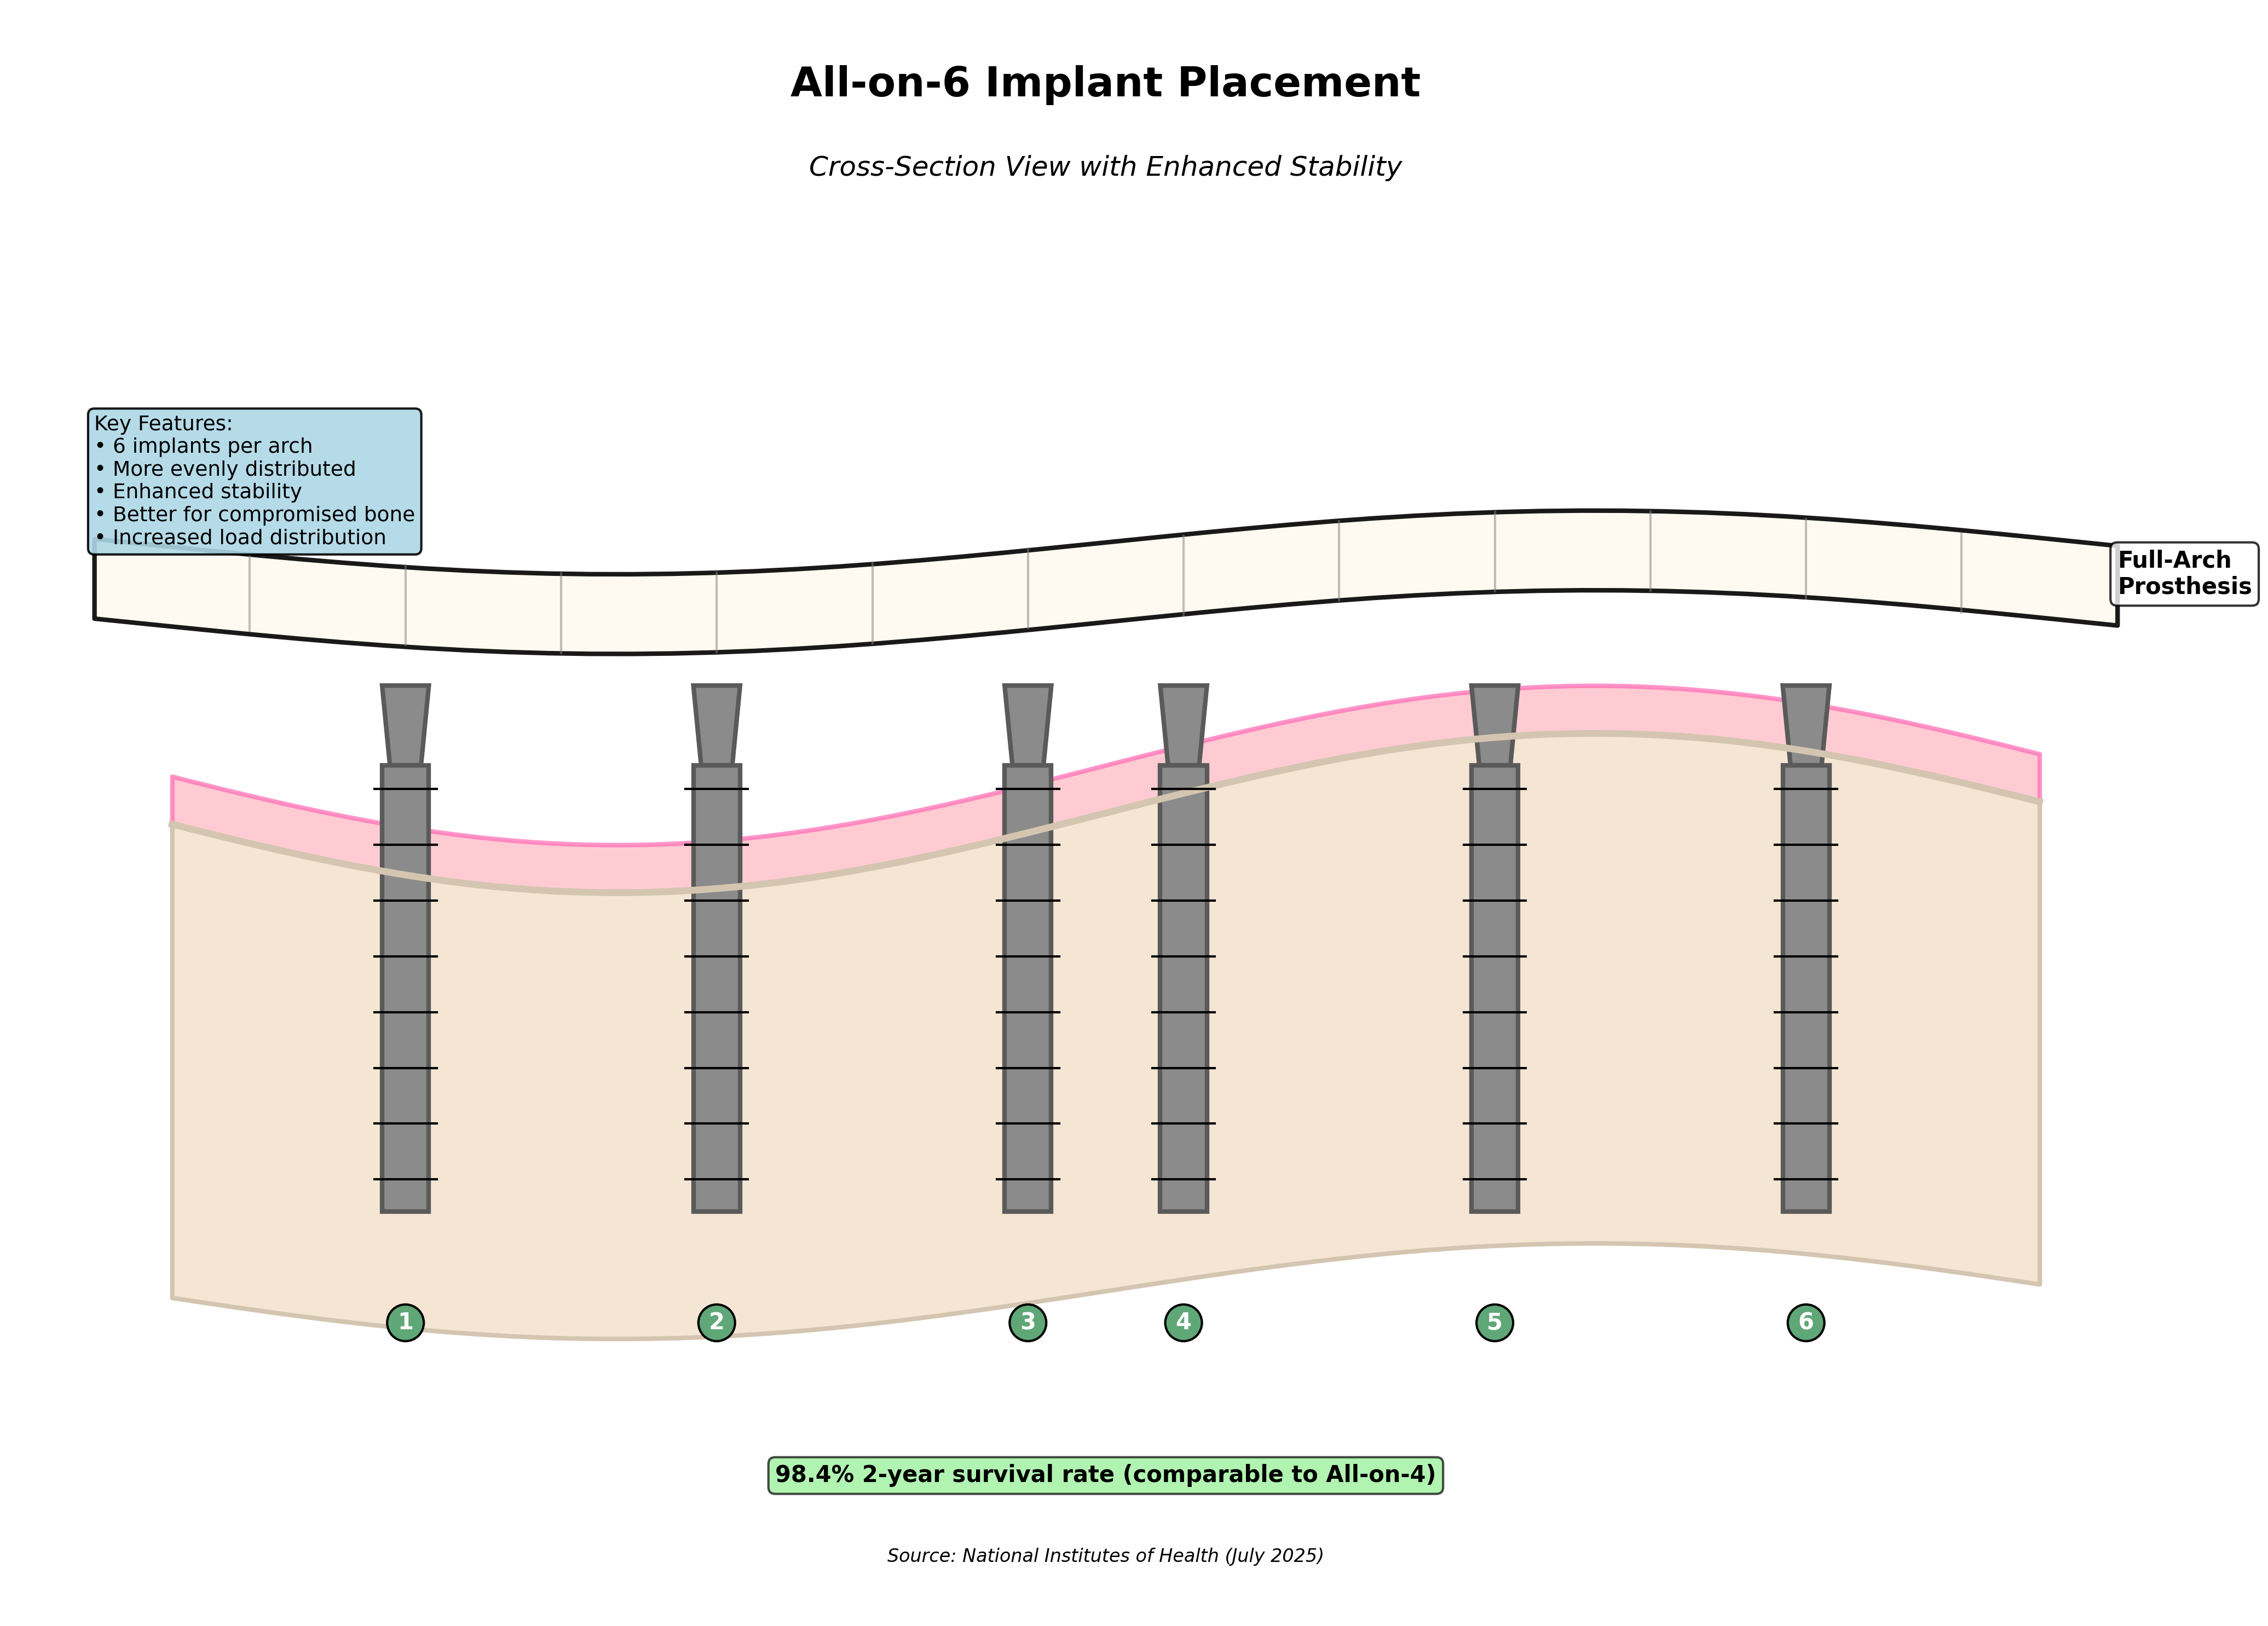
The All-on-6 technique builds upon the principles of All-on-4 while providing additional support through six strategically placed implants. This approach offers enhanced stability and is particularly beneficial for specific clinical situations.
The Strategic Placement:All-on-6 typically involves:
- Two anterior (front) implants placed vertically
- Four posterior implants providing additional support in the back regions
The exact configuration may vary based on individual anatomy and clinical needs, but the principle remains consistent: more implants provide more support and better load distribution.
Enhanced Load Distribution:With six implants instead of four, chewing forces are distributed across more support points. This is similar to the difference between a four-legged table and a six-legged table—both are stable, but the six-legged version distributes weight more evenly and provides additional security.
Clinical Advantages
The All-on-6 technique offers specific advantages that make it the preferred choice in certain situations:
Stronger Foundation:Six implants provide a more robust foundation for the prosthesis. This enhanced support can be particularly beneficial for patients with:
- Stronger bite forces
- Habits like teeth grinding (bruxism)
- Desire for maximum stability
Patients with more significant bone loss may benefit from the additional implants. While All-on-4 is designed to work with limited bone, All-on-6 can provide better outcomes when bone quality or quantity is compromised in certain areas.
Enhanced Stability and Integration:More implants mean more surface area for bone integration (osseointegration). This can contribute to:
- Increased overall stability
- Better long-term bone preservation
- Enhanced prosthetic support
The additional implants distribute chewing forces more evenly, which can:
- Reduce stress on individual implants
- Potentially extend the longevity of both implants and prosthesis
- Provide more natural chewing function
In the unlikely event that one implant experiences complications, five remaining implants can continue to support the prosthesis. This built-in redundancy provides additional security, though it's important to note that implant failure is rare with either technique.
Success Rates and Clinical Evidence
The All-on-6 technique demonstrates success rates that are remarkably similar to All-on-4:
Short-Term Success:- 2-year cumulative survival rate: 98.4%
This is virtually identical to the All-on-4 rate of 98.6%, demonstrating that both techniques achieve excellent short-term outcomes.
Medium-Term Success:- 5-year cumulative survival rate: Statistically comparable to All-on-4 (p = 0.362)
The p-value of 0.362 is particularly important from a statistical standpoint. In clinical research, a p-value greater than 0.05 indicates no statistically significant difference. This means that at five years, All-on-4 and All-on-6 perform equally well.
Long-Term Success:- High long-term success rates comparable to All-on-4
The long-term data continues to show excellent outcomes, with both techniques demonstrating 90-98% survival rates over 10-15 years.
Clinical Interpretation:The similarity in success rates between All-on-4 and All-on-6 is actually good news for patients—it means the choice between techniques can be based on individual clinical factors rather than concerns about one being "better" than the other. Both are highly successful when properly executed.
Ideal Candidates for All-on-6
Certain patient characteristics make All-on-6 the preferred choice:
Significant Bone Loss:Patients with more extensive bone loss, particularly in the posterior (back) regions, may benefit from the additional implants that All-on-6 provides.
Strong Bite Forces:Individuals with naturally strong bite forces or habits like teeth grinding may benefit from the enhanced support and load distribution of six implants.
Desire for Maximum Stability:Some patients simply prefer the additional security that comes with more implants, even if All-on-4 would be clinically adequate.
Specific Anatomical Considerations:Certain jaw shapes or bone configurations may be better suited to six-implant placement.
Previous Implant Experience:Patients who have experienced implant complications in the past may prefer the additional redundancy of All-on-6.
2.3 Comparing All-on-4 vs. All-on-6
Statistical Comparison and Clinical Equivalence
One of the most important findings from recent research is that All-on-4 and All-on-6 demonstrate statistically equivalent outcomes:
The Evidence:According to National Institutes of Health studies published in July 2025:
- 2-year survival rates: 98.6% (All-on-4) vs. 98.4% (All-on-6)
- 5-year survival rates: No statistically significant difference (p = 0.362)
- Long-term outcomes: Both techniques show 90-98% survival over 10-15 years
The statistical equivalence means that your choice between All-on-4 and All-on-6 should be based on individual clinical factors, not concerns about one technique being inherently superior. Both are excellent options with proven track records.
Decision Factors: Choosing the Right Technique
Since success rates are comparable, how do oral surgeons determine which technique is best for each patient? Several key factors guide this decision:
Bone Quality and Quantity:This is often the primary determining factor:
- Good bone density and volume: All-on-4 is typically sufficient and preferred for its efficiency
- Compromised bone in posterior regions: All-on-6 may provide better support
- Significant bone loss: All-on-6 distributes forces across more implants
- Excellent bone throughout: Either technique works well; other factors determine choice
Every patient's anatomy is unique:
- Jaw shape and size
- Location of sinuses (upper jaw) and nerves (lower jaw)
- Distribution of available bone
- Existing bone defects or irregularities
Advanced 3D imaging (CBCT scans) allows precise evaluation of these factors, enabling customized treatment planning.
Bite Force and Functional Demands:- Patients with strong bite forces may benefit from All-on-6
- History of teeth grinding (bruxism) may favor more implants
- Dietary preferences and chewing habits factor into the decision
- All-on-4 typically costs less due to fewer implants
- All-on-6 involves additional implants and potentially higher cost
- Both represent excellent long-term value
- Insurance coverage and financing options affect affordability
- Some patients prefer the efficiency of All-on-4
- Others value the additional security of All-on-6
- Timeline preferences may influence the decision
- Individual comfort level with each approach matters
Your oral surgeon's clinical assessment, based on comprehensive evaluation and experience, provides expert guidance. The recommendation considers all factors together to determine the optimal approach for your specific situation.
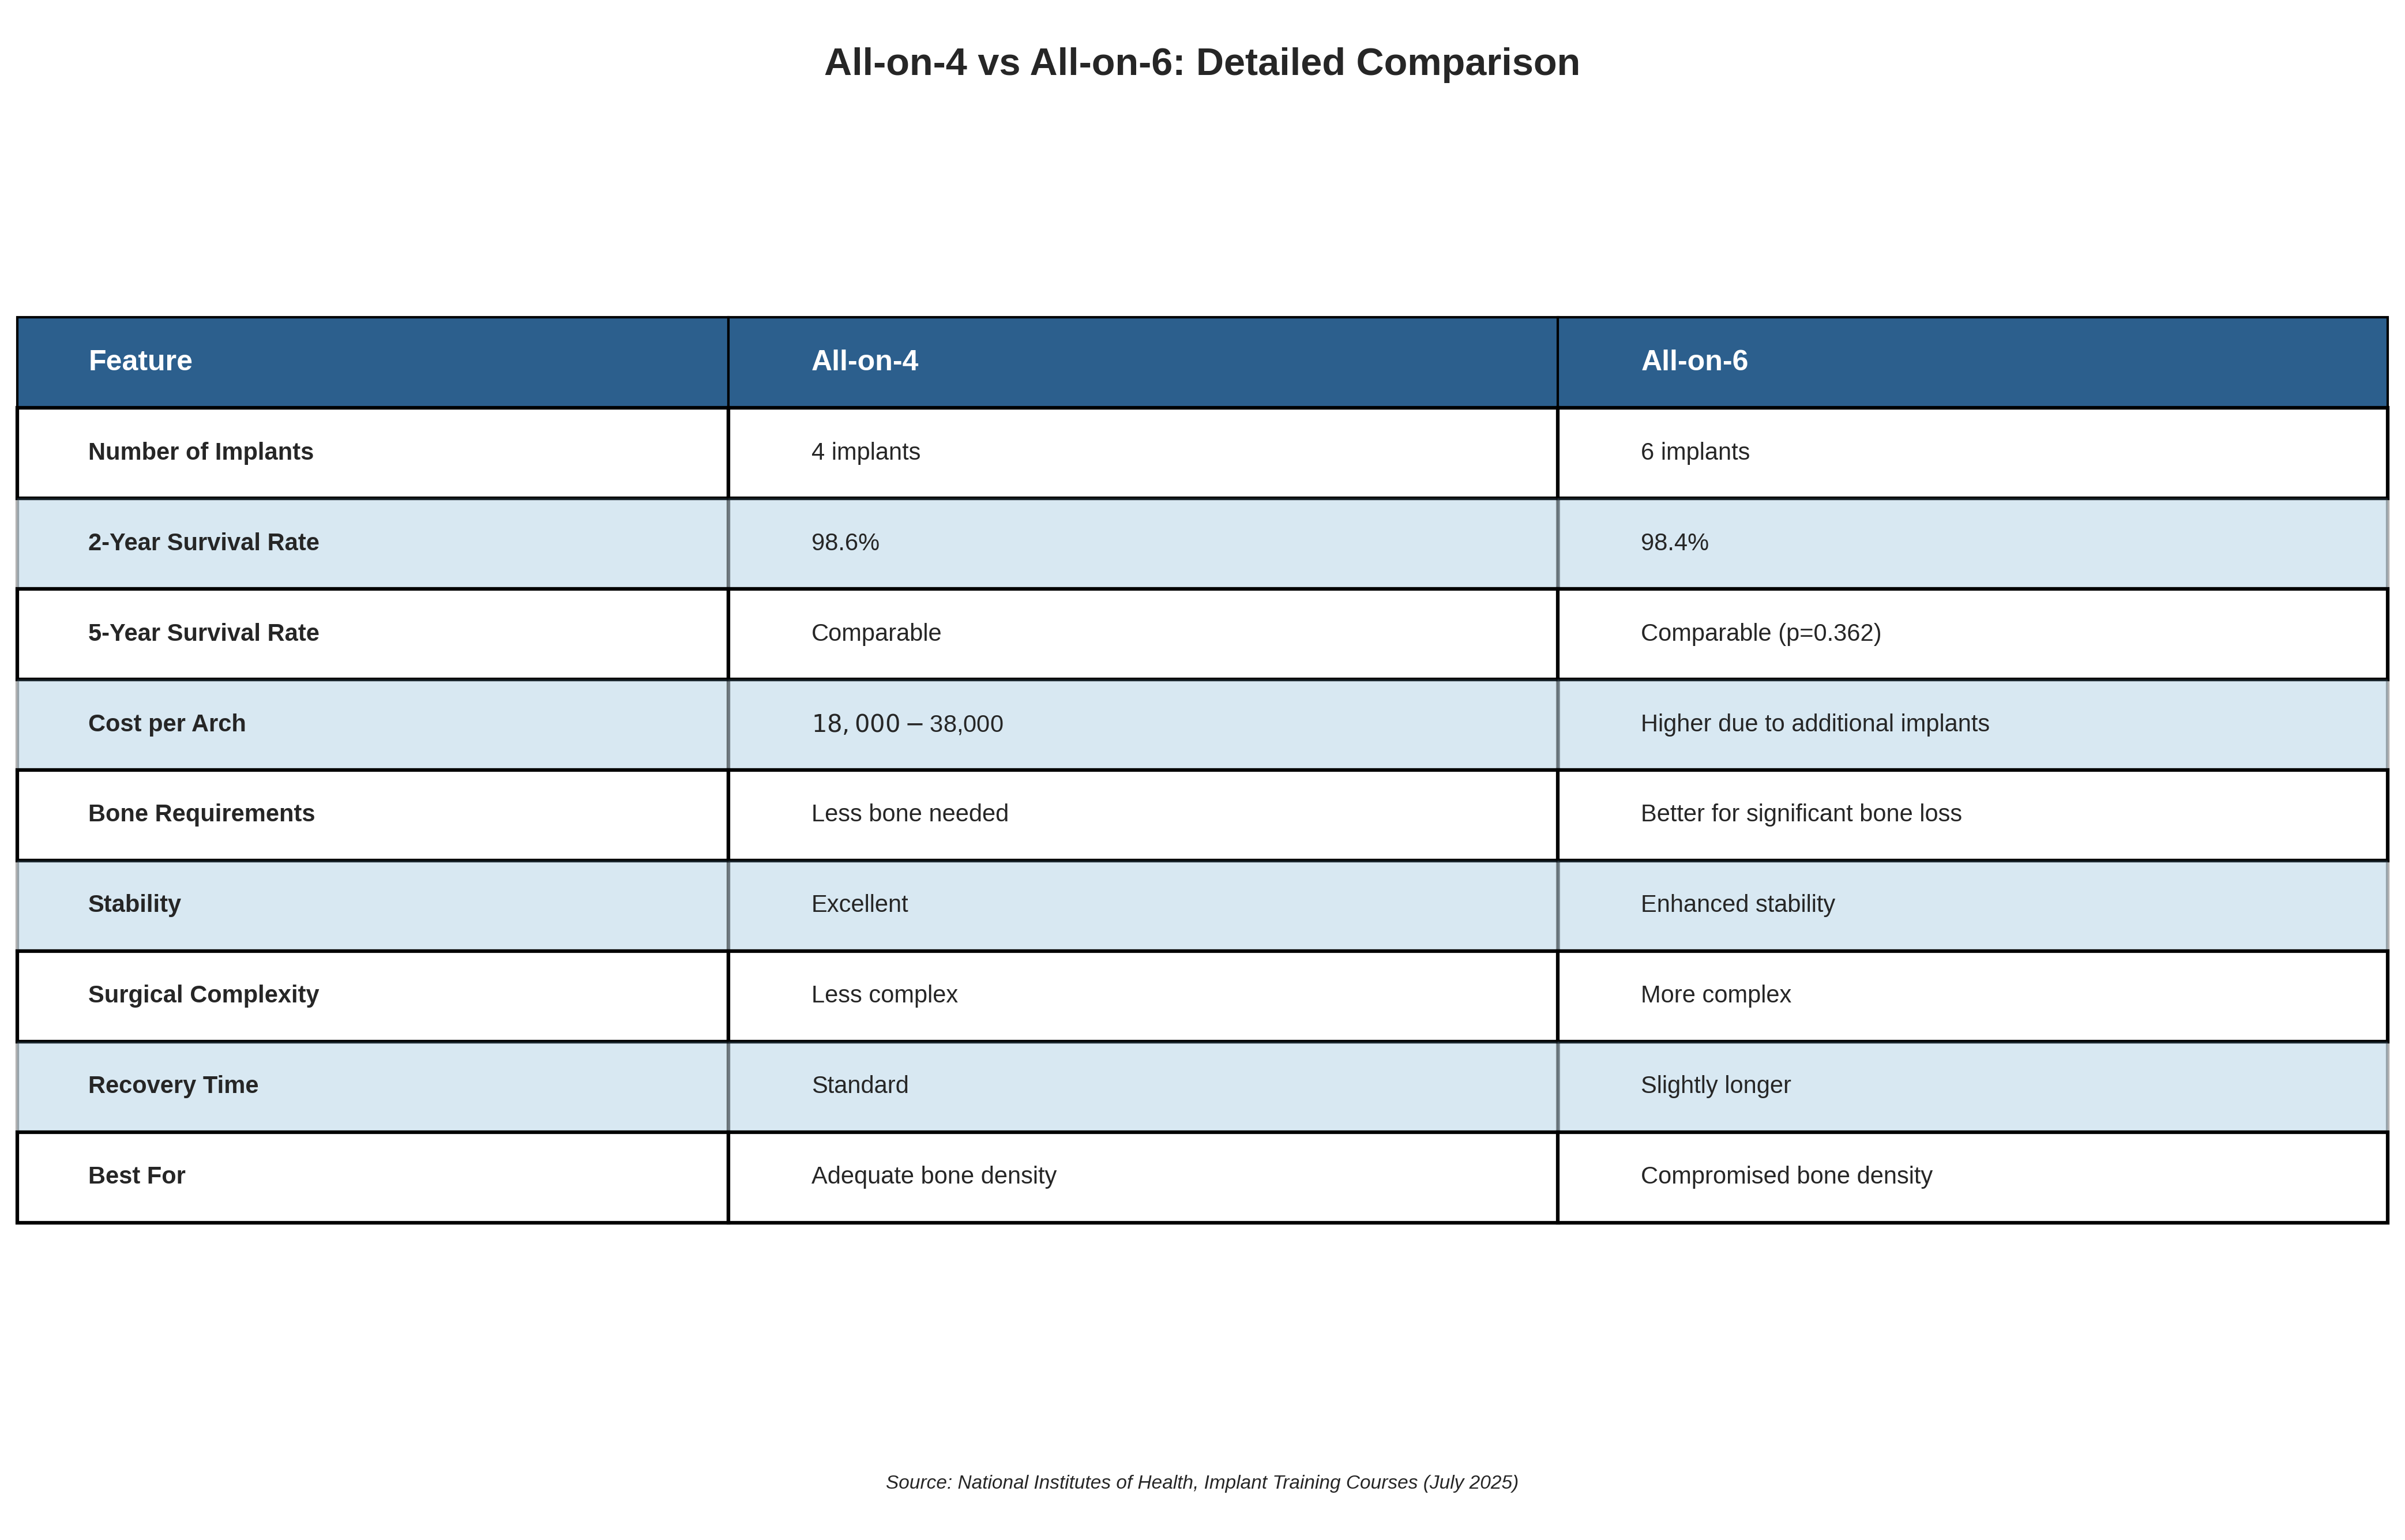
Comprehensive Comparison Table
[TABLE: All-on-4 vs. All-on-6 Detailed Comparison]
| Factor | All-on-4 | All-on-6 | |--------|----------|----------| | Number of Implants | 4 implants | 6 implants | | 2-Year Survival Rate | 98.6% | 98.4% | | 5-Year Survival Rate | Comparable (no significant difference) | Comparable (p=0.362) | | Cost Range (2025) | $18,000-$38,000 per arch | Higher due to additional implants | | Bone Requirements | Less bone needed | Better for significant bone loss | | Surgical Complexity | Less complex | More complex | | Stability | Excellent | Enhanced stability | | Load Distribution | Effective | More distributed | | Treatment Time | Typically shorter | Potentially longer | | Ideal For | Good bone density, efficiency-focused | Bone loss, maximum stability desired |
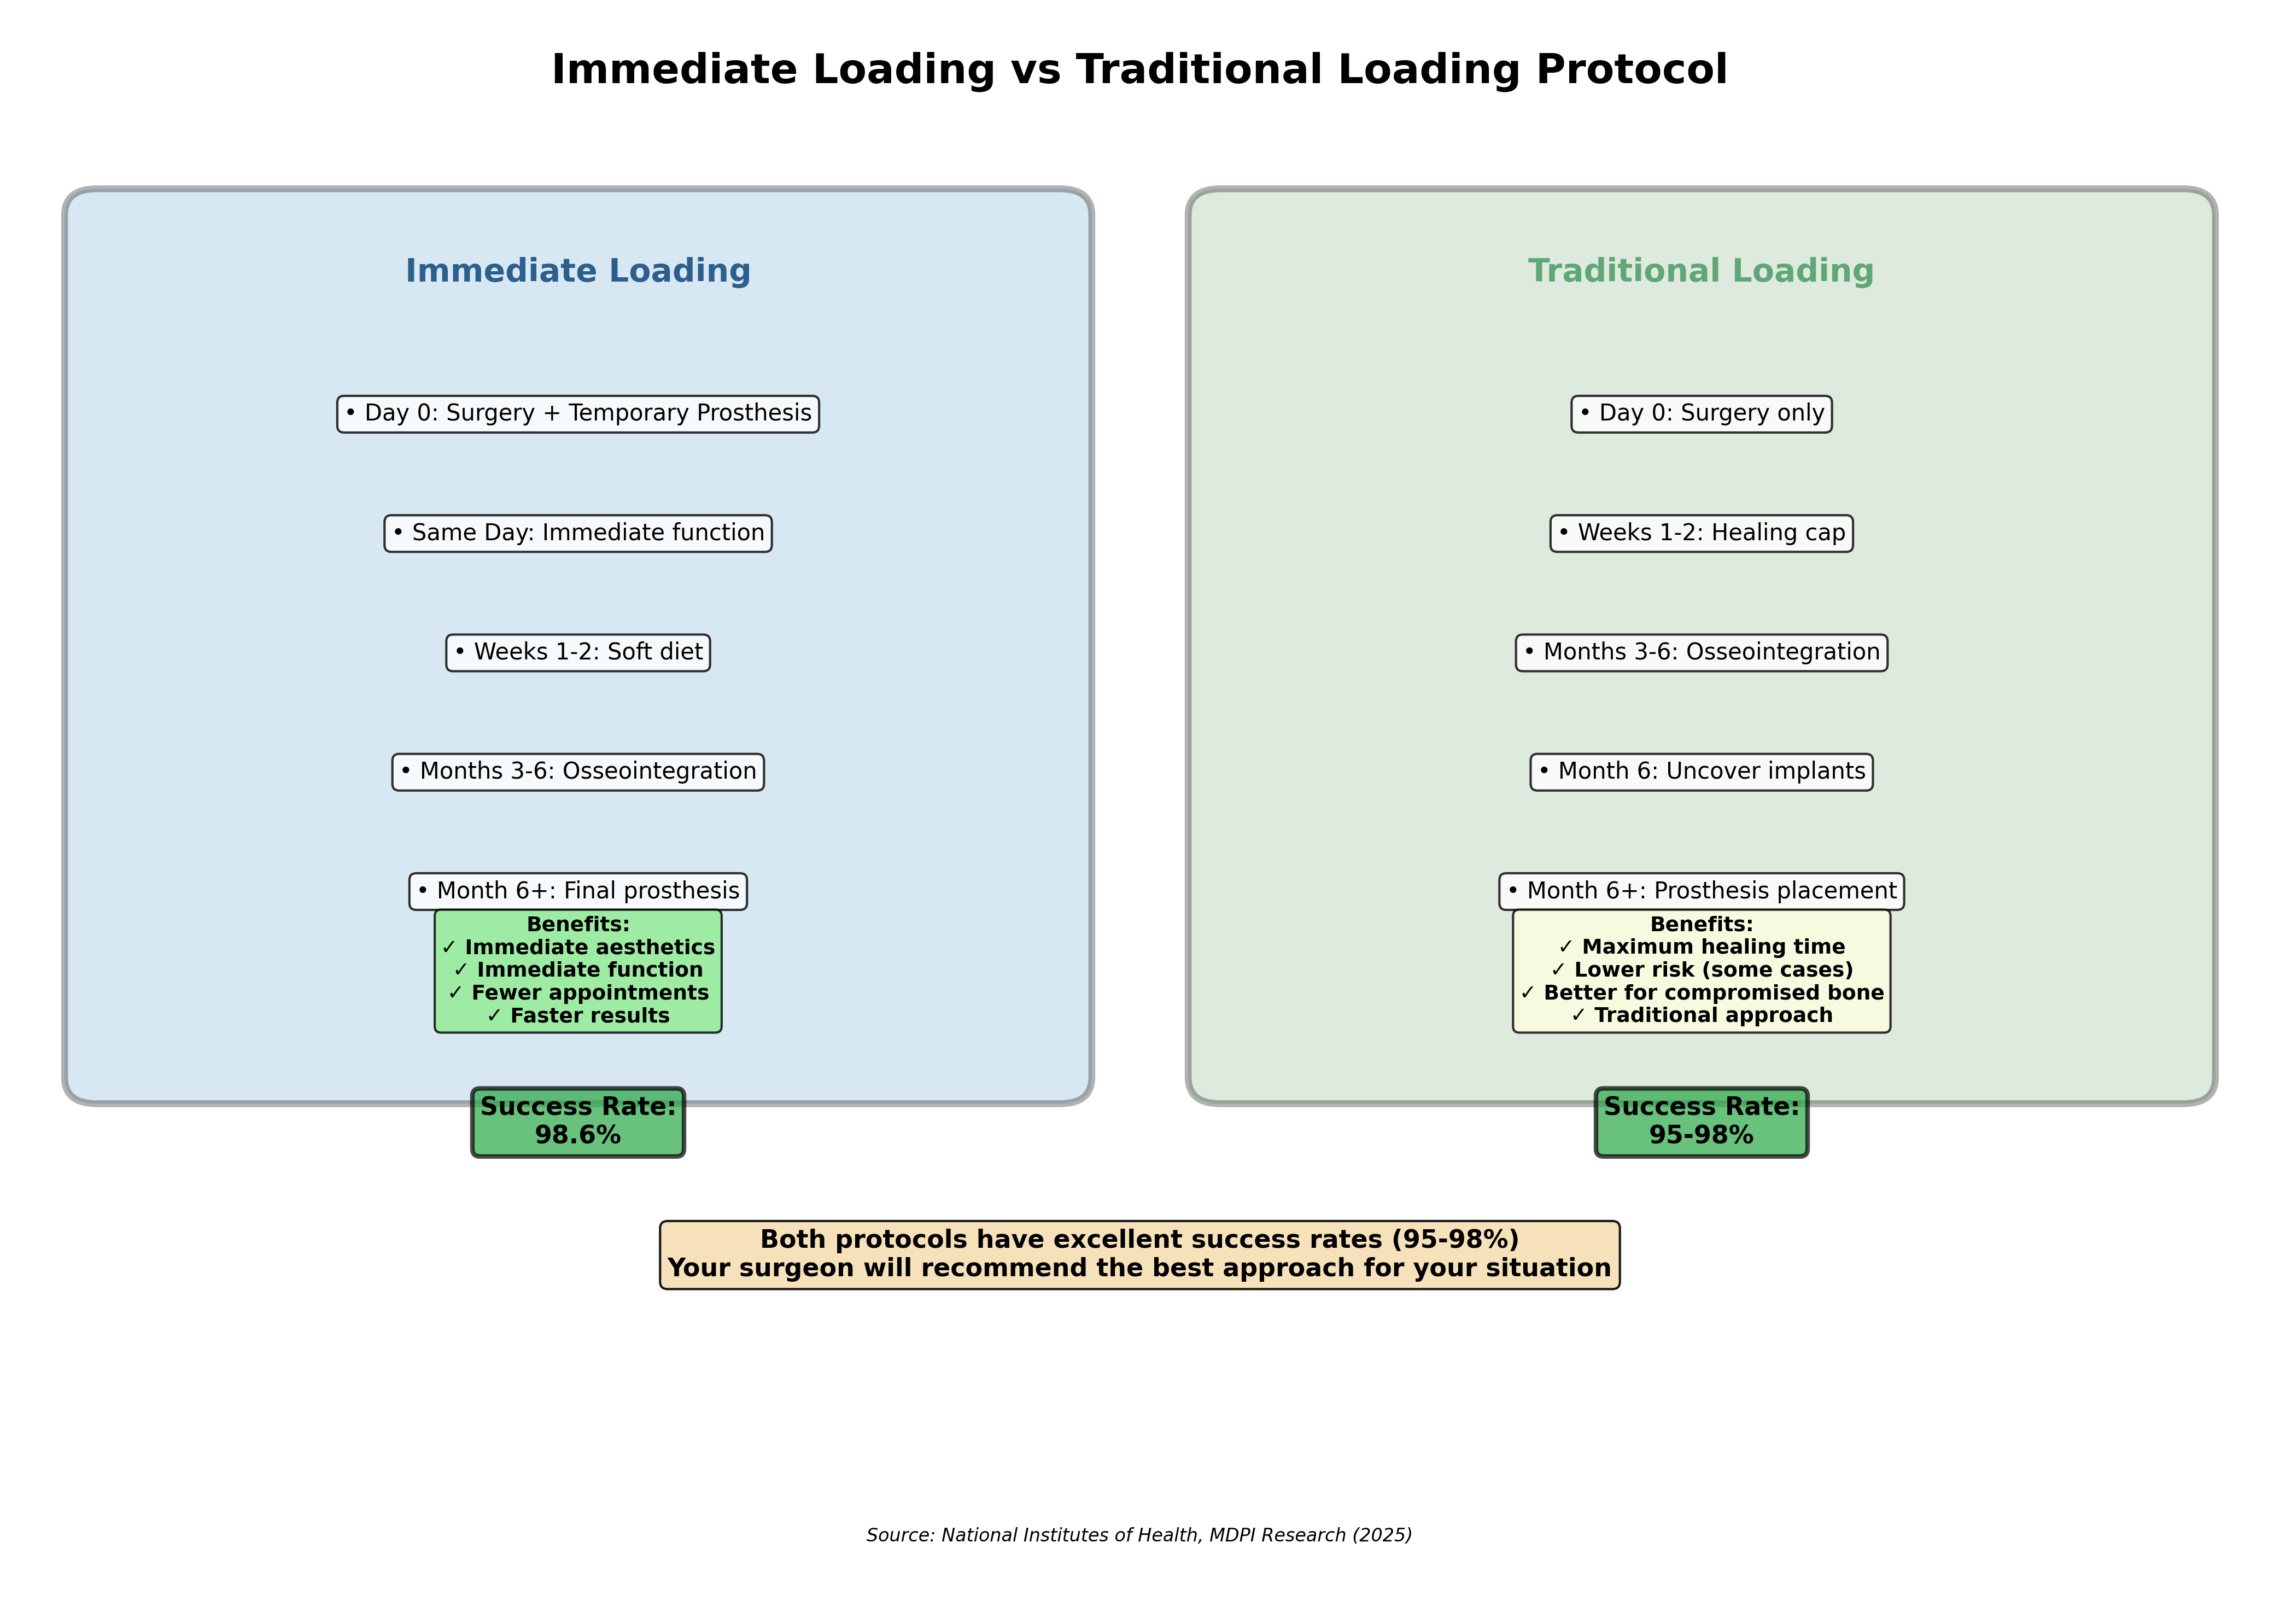
2.4 Immediate Loading Protocols and Same-Day Teeth
The Same-Day Teeth Concept
One of the most appealing aspects of modern full-arch implant treatment is the possibility of receiving teeth on the same day as implant placement. This immediate loading protocol has transformed the patient experience.
What Is Immediate Loading?Immediate loading means that a temporary prosthesis is attached to the implants on the same day they're placed, rather than waiting months for healing before attaching teeth. This "teeth in a day" approach offers obvious advantages:
- No period without teeth
- Immediate restoration of function and aesthetics
- Faster return to normal activities
- Reduced number of surgical appointments
- Psychological benefits of immediate results
The immediate loading process typically follows this sequence:
- Implant Placement: The implants are surgically placed in their planned positions
- Stability Assessment: The surgeon verifies that each implant has achieved adequate primary stability
- Temporary Prosthesis Attachment: A pre-fabricated or same-day fabricated temporary prosthesis is attached to the implants
- Healing Period: The implants integrate with bone over 3-6 months while the temporary prosthesis is in place
- Final Prosthesis: After complete healing, the temporary prosthesis is replaced with the permanent restoration
Patient Selection Criteria for Immediate Loading
Not every patient is a candidate for immediate loading. Specific criteria must be met:
Adequate Primary Stability:The implants must achieve sufficient initial stability in the bone. This is measured during surgery and depends on:
- Bone density and quality
- Implant design and size
- Surgical technique
- Proper implant positioning
Denser bone provides better initial stability, making immediate loading more predictable. Patients with softer bone may need to wait for osseointegration before loading.
Absence of Active Infection:The surgical site must be free of active infection to support immediate loading.
Patient Compliance:Immediate loading requires strict adherence to post-operative instructions:
- Soft diet during initial healing
- Careful oral hygiene
- Avoiding excessive force on the temporary prosthesis
- Attending all follow-up appointments
Patients must understand that the immediate prosthesis is temporary and will be replaced with the final restoration after healing.
Advantages and Considerations
Advantages of Immediate Loading:- Immediate Function: Ability to eat (soft foods) and speak normally right away
- Aesthetic Restoration: No period without teeth
- Psychological Benefits: Immediate visible results boost confidence
- Reduced Treatment Time: Fewer appointments and shorter overall timeline
- Tissue Shaping: The temporary prosthesis helps shape gum tissues for optimal final aesthetics
- Dietary Restrictions: Soft diet required during initial healing (typically 3-6 months)
- Temporary Nature: The immediate prosthesis is not the final restoration
- Careful Maintenance: Extra care needed to protect healing implants
- Not Universal: Not all patients qualify for immediate loading
- Potential Adjustments: The temporary prosthesis may require adjustments during healing
Temporary vs. Final Prosthesis Timeline
Understanding the timeline helps set appropriate expectations:
Day of Surgery:- Implants placed
- Temporary prosthesis attached (if immediate loading)
- Initial healing begins
- Most acute healing occurs
- Soft diet maintained
- Careful oral hygiene
- Possible suture removal
- Continued osseointegration
- Gradual diet expansion (still avoiding hard foods)
- Regular follow-up appointments
- Temporary prosthesis adjustments as needed
- Osseointegration completes
- Bone matures around implants
- Preparation for final prosthesis begins
- Typically 4-6 months after implant placement
- Custom-designed permanent restoration
- Full function and aesthetics achieved
- Return to normal diet
2.5 Prosthetic Materials and Options
Understanding Prosthetic Choices
The prosthesis—the visible teeth that attach to your implants—can be fabricated from different materials, each with specific advantages:
Zirconia Prostheses:Zirconia is a high-strength ceramic material that has become increasingly popular for full-arch restorations:
- Aesthetics: Excellent natural appearance with translucency similar to natural teeth
- Strength: Very high durability and fracture resistance
- Biocompatibility: Excellent tissue compatibility with minimal plaque accumulation
- Stain Resistance: Highly resistant to staining from foods and beverages
- Longevity: Exceptional durability with proper care
- Cost: Higher investment due to material and fabrication complexity
- Repairability: Difficult to repair if damaged; may require replacement
Acrylic-based prostheses offer a more affordable option with specific advantages:
- Cost: More affordable than zirconia
- Aesthetics: Good appearance that can be customized
- Weight: Lighter than zirconia
- Repairability: Easier to repair and adjust if needed
- Replacement: May require replacement over time due to wear
- Maintenance: Requires regular professional cleaning and maintenance
Some prostheses combine materials, such as acrylic teeth on a metal or zirconia framework, offering a balance of strength, aesthetics, and cost.
Choosing the Right Material
The choice of prosthetic material depends on several factors:
- Budget: Zirconia costs more but may offer better long-term value
- Aesthetic Priorities: Both materials can achieve excellent aesthetics
- Durability Needs: Zirconia offers superior long-term durability
- Bite Force: Patients with strong bite forces may benefit from zirconia's strength
- Repairability Concerns: Acrylic is easier to repair if damage occurs
- Long-Term Plans: Consider how long you plan to keep the prosthesis
Your oral surgeon and prosthodontist will help you understand the options and make the choice that best fits your needs and goals.
Key Takeaways
As we conclude Module 2, let's review the essential concepts:
- All-on-4 and All-on-6 both offer excellent success rates (98%+ at 2 years) with no statistically significant difference in outcomes. Both are proven, reliable techniques.
- Technique selection is based on individual clinical factors including bone quality and quantity, anatomical considerations, bite force, budget, and patient preferences—not on one technique being inherently superior.
- All-on-4 uses four strategically placed implants with angled posterior implants that maximize bone contact, avoid anatomical structures, and often eliminate the need for bone grafting.
- All-on-6 provides enhanced support through six implants, offering advantages for patients with significant bone loss, strong bite forces, or desire for maximum stability.
- Immediate loading protocols allow same-day teeth in appropriate cases, providing immediate function and aesthetics while implants integrate with bone.
- Long-term outcomes are comparable between techniques, with both showing 90-98% survival rates over 10-15 years.
- Prosthetic material choices (zirconia vs. acrylic) affect aesthetics, durability, cost, and maintenance requirements.
- Advanced technology and careful planning ensure optimal implant placement and prosthetic design for predictable, successful outcomes.
Reflection Questions
To deepen your understanding of this module's content, consider these questions:
- Given the comparable success rates between All-on-4 and All-on-6, what factors would be most important to you in choosing between them?
- How does the strategic angulation of posterior implants in All-on-4 address multiple clinical challenges simultaneously?
- What are the trade-offs between immediate loading (same-day teeth) and traditional delayed loading?
- How do prosthetic material choices reflect different priorities in terms of aesthetics, durability, cost, and maintenance?
Looking Ahead
In Module 3, we'll walk through the complete patient journey from initial consultation to final restoration. You'll learn what to expect at each stage, including timelines, preparatory procedures, the surgical process, healing phases, and the path to your final prosthesis. This comprehensive overview will help you understand the entire treatment experience.
Visual Content Placeholders
[DIAGRAM: All-on-4 Implant Placement - Detailed illustration showing two vertical anterior implants and two angled posterior implants with degree measurements]
[DIAGRAM: All-on-6 Implant Configuration - Illustration showing six-implant placement pattern]
[CHART: Success Rate Comparison - Bar graph comparing 2-year and 5-year survival rates for All-on-4 (98.6%, comparable) vs. All-on-6 (98.4%, comparable)]
[TABLE: Comprehensive All-on-4 vs. All-on-6 Comparison - Detailed comparison table as shown in section 2.3]
[INFOGRAPHIC: Immediate Loading Timeline - Visual timeline showing day of surgery through final prosthesis delivery]
[IMAGE: Zirconia vs. Acrylic Prostheses - Side-by-side comparison of prosthetic materials]
[DIAGRAM: Load Distribution - Visual representation of how forces distribute across 4 vs. 6 implants]
[CHART: Cost Comparison - Bar graph showing typical cost ranges for All-on-4 ($18,000-$38,000) vs. All-on-6]
Module 2 Complete Continue to Module 3: The Patient Journey - From Consultation to Final Restoration